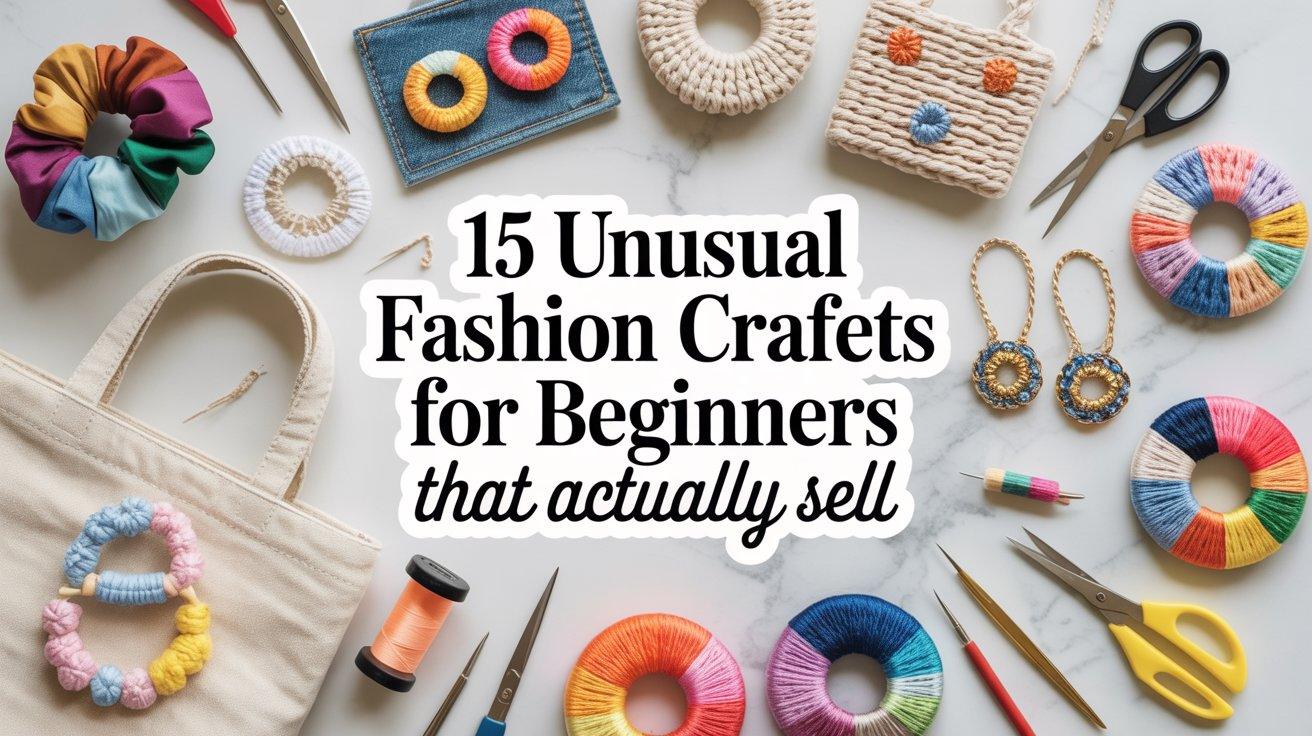
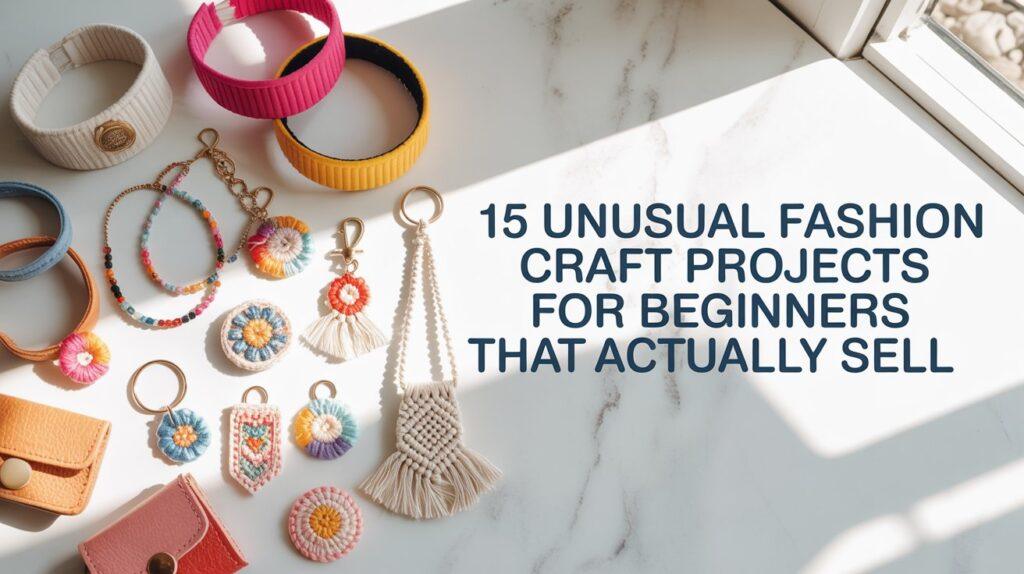
You’ve seen the scrunchie tutorials. You’ve scrolled past another tote bag DIY. And you know that making the same thing as everyone else is a fast track to crickets at your craft booth.
I wanted something different. Not harder, just… not boring.
So I went looking for projects that are beginner-friendly but actually original. Things that make people stop and say “wait, what is that?” because they’ve never seen it before.
Here are 15 unusual fashion craft projects that are simple to make but genuinely unique. No scrunchies, no basic totes, no friendship bracelets. Just fresh ideas that can help you stand out and actually sell.
Why This Matters
The handmade market is crowded. Really crowded. If you want to make money from craft projects, you can’t just copy what everyone else is doing. You need to offer something different.
The good news? Unique doesn’t have to mean complicated. Some of the most interesting fashion items come from simple techniques and unexpected materials. This list focuses on projects that are genuinely unusual but still doable for beginners.
Main Content: 15 Unusual Fashion Craft Projects
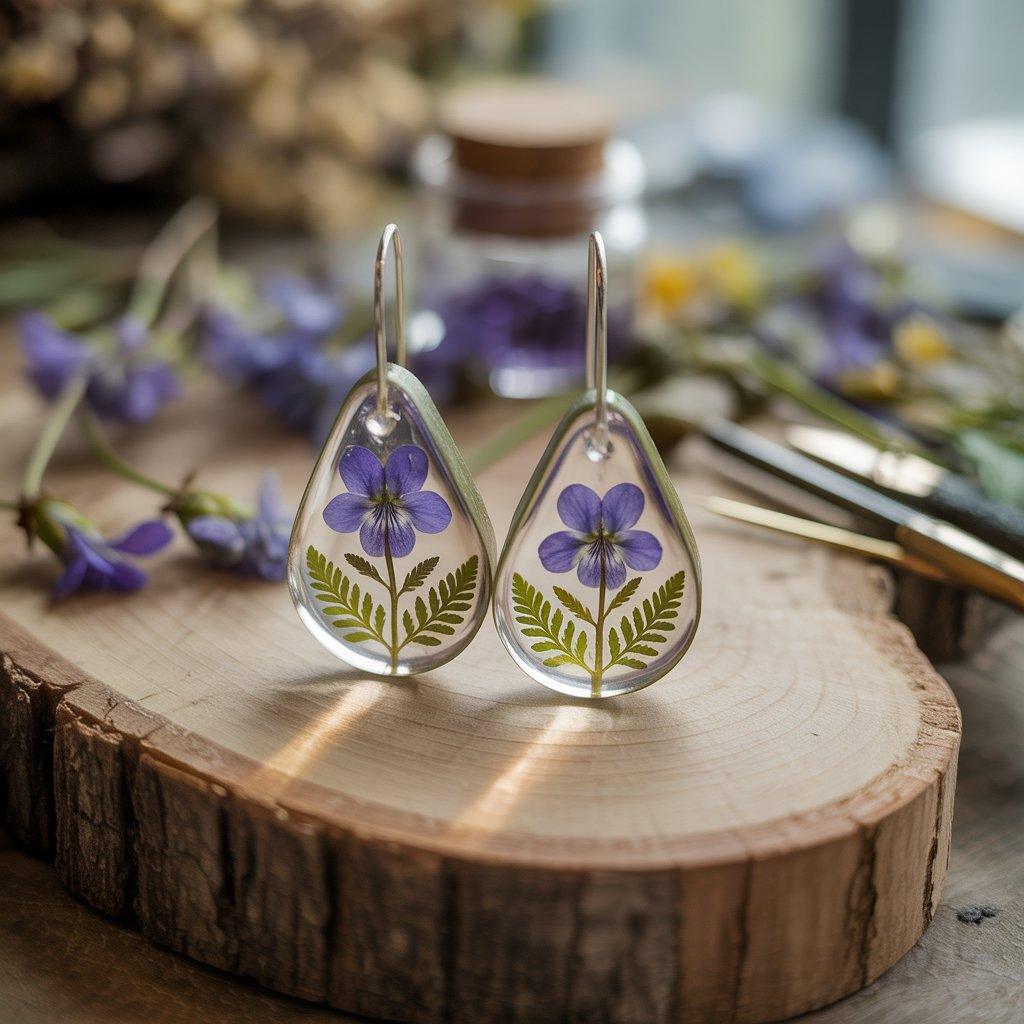
1. Pressed Flower Resin Earrings
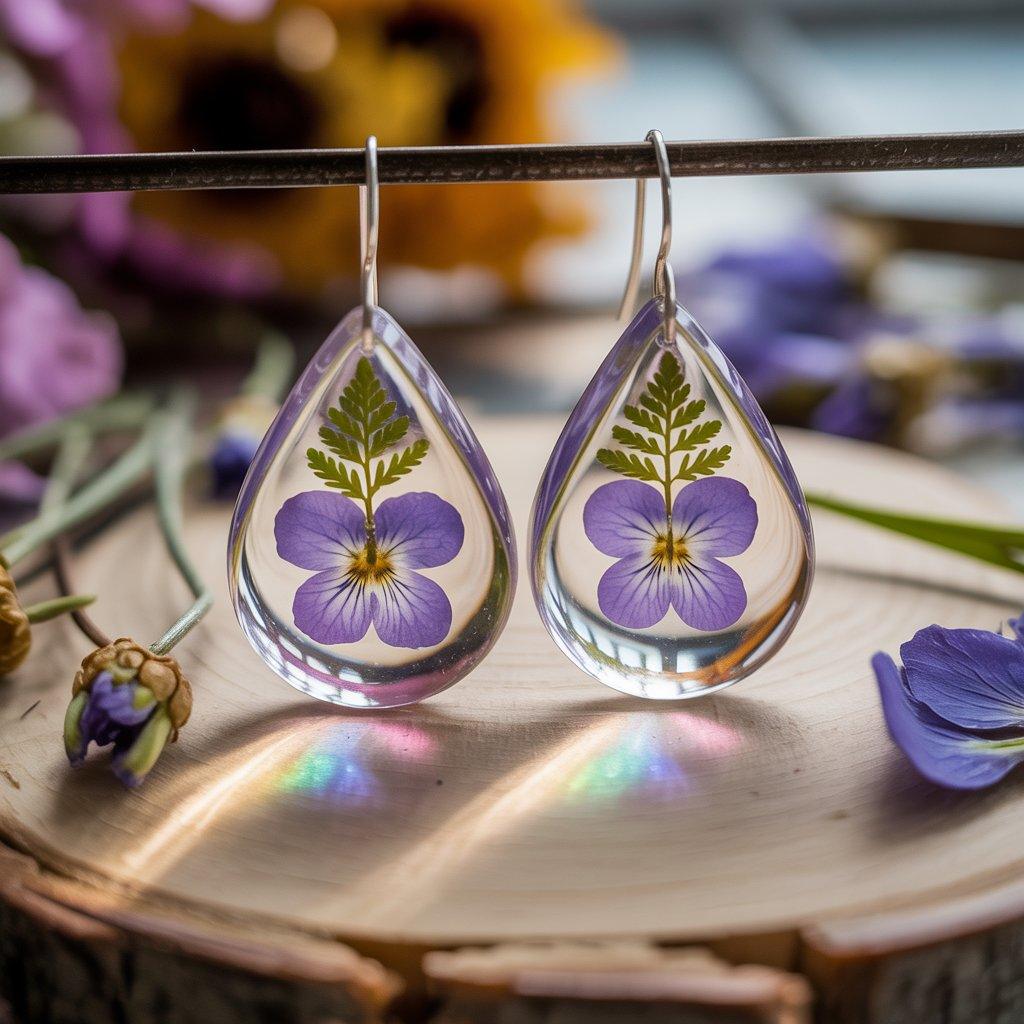
Instead of painting or drawing on earrings, why not preserve real flowers inside them? Clear UV resin lets you capture tiny dried blooms, leaves, or even small ferns inside lightweight earring molds. Press flowers flat in a heavy book for a week first.
Then layer resin, place the flower, add another resin layer, and cure it under a UV lamp. The result looks like wearable nature. People go crazy for botanical jewelry because each piece is truly one of a kind. You can sell pressed flower earrings for $12 to $20 a pair. This product can help you learn resin casting without needing expensive molds. Start with simple round or teardrop shapes.
Just work in a well-ventilated area and wear gloves. Once you get comfortable, you can experiment with adding tiny gold flakes or multiple flower layers for a 3D effect. Resin pieces sell especially well at farmer’s markets and spring craft fairs. Buyers love that no two pairs are exactly alike.
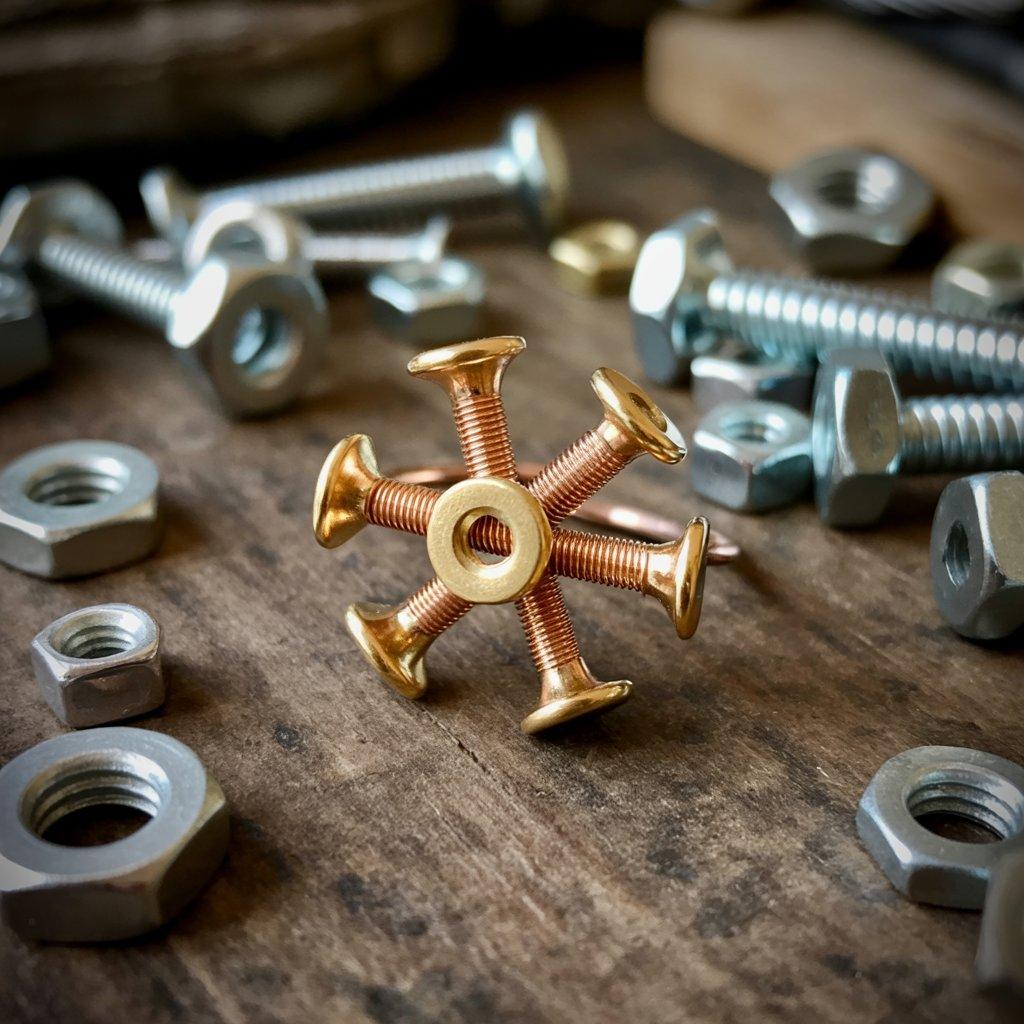
2. Hardware “Flower” Rings
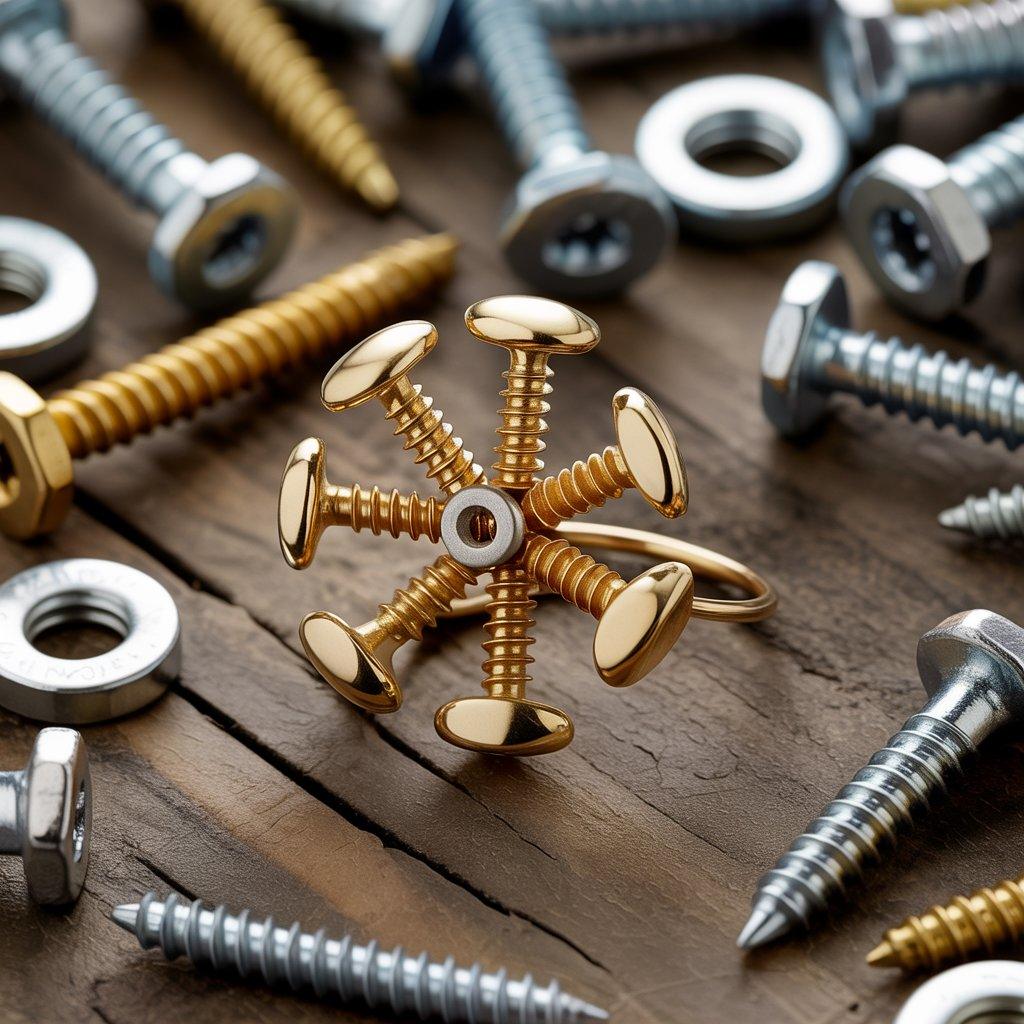
Forget pretty gemstones. Grab some small screws, washers, and nuts from the hardware store instead. With a little patience and some wire, you can turn ordinary metal hardware into a surprisingly elegant flower ring. Arrange five or six small screws in a circle to look like petals.
Use thin wire or metal glue to secure them around a larger washer as the center. Sand down any sharp edges so it’s comfortable to wear. This project costs under $2 per ring in supplies, but you can sell finished rings for $8 to $12. This product can help you practice working with metal without needing expensive soldering tools.
The look is industrial but also delicate, which appeals to people who love steampunk or edgy fashion. Make a few in different finishes. Gold-tone screws look luxe, while silver has a more modern feel. These rings are conversation starters. People will genuinely not believe you made them from hardware store finds.
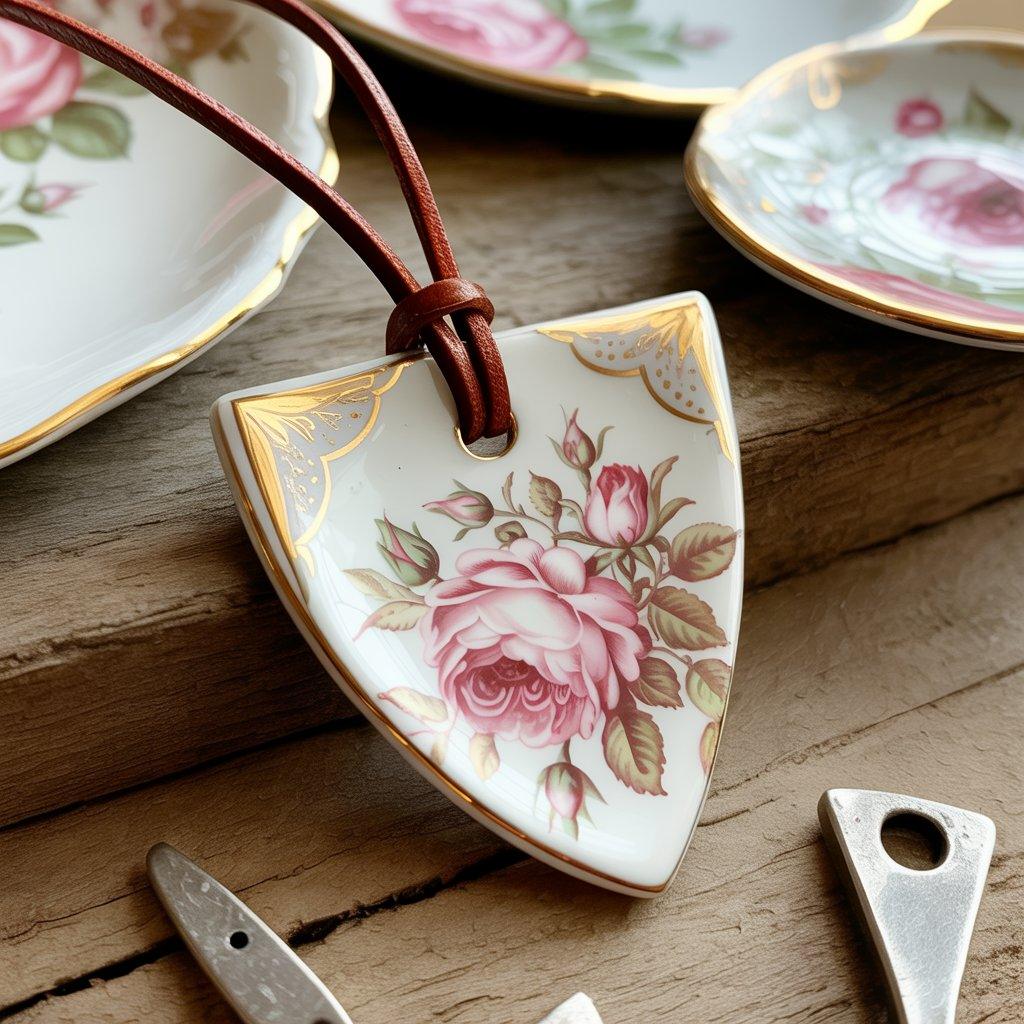
3. Broken Plate Pendant Necklaces
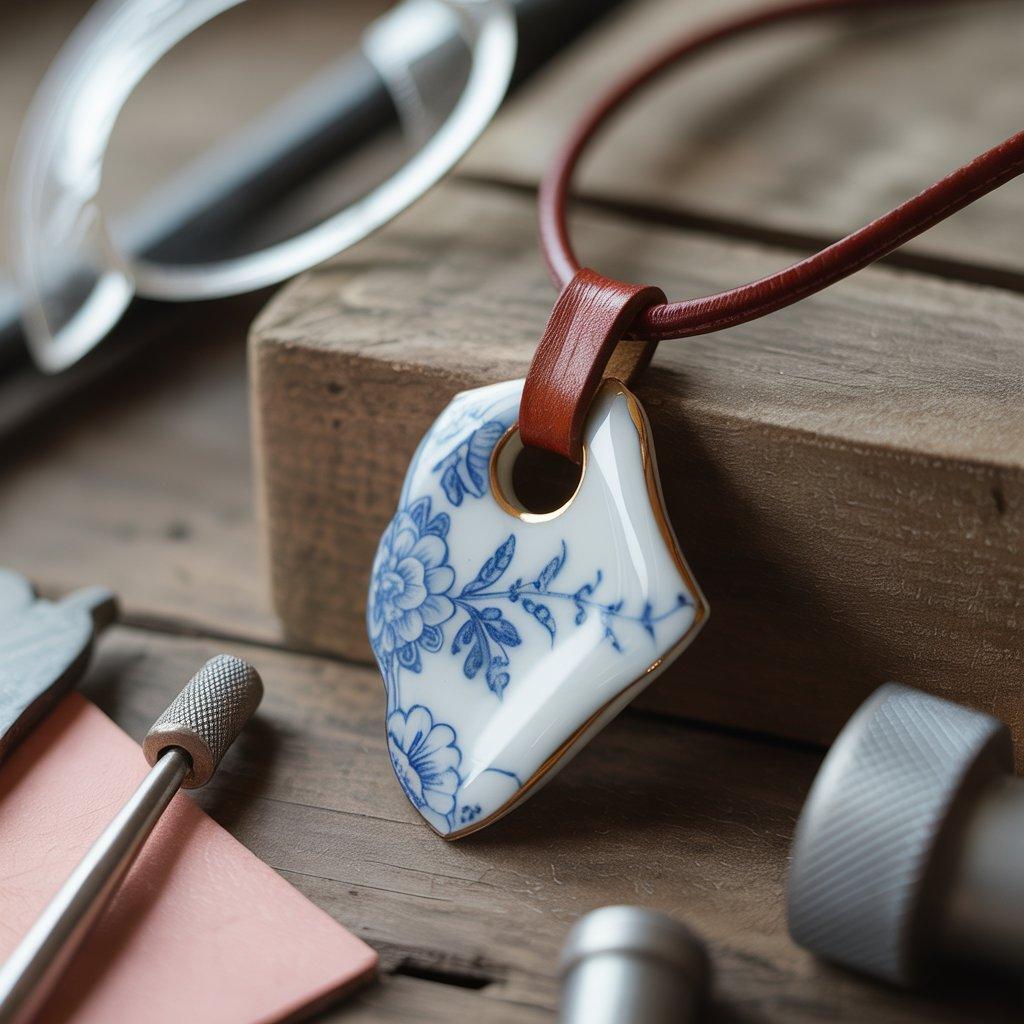
That cracked plate sitting in the back of your cupboard? Don’t throw it away. Break it into small pieces (safely, with goggles on) and turn the prettiest shard into a one-of-a-kind pendant. Use a permanent marker to draw the shape you want on a broken plate piece.
Then use a diamond drill bit to make a small hole for hanging. Sand the edges smooth so they’re not sharp. String it onto a leather cord or simple chain. Vintage floral plates work best because the patterns are already beautiful. You can find chipped plates for free or for a dollar at thrift stores.
Sell each pendant for $10 to $15. This product can help you learn basic jewelry assembly without starting from scratch. The charm comes entirely from the upcycled material. People love that you saved something broken from the trash. Plus, each pendant tells a story.
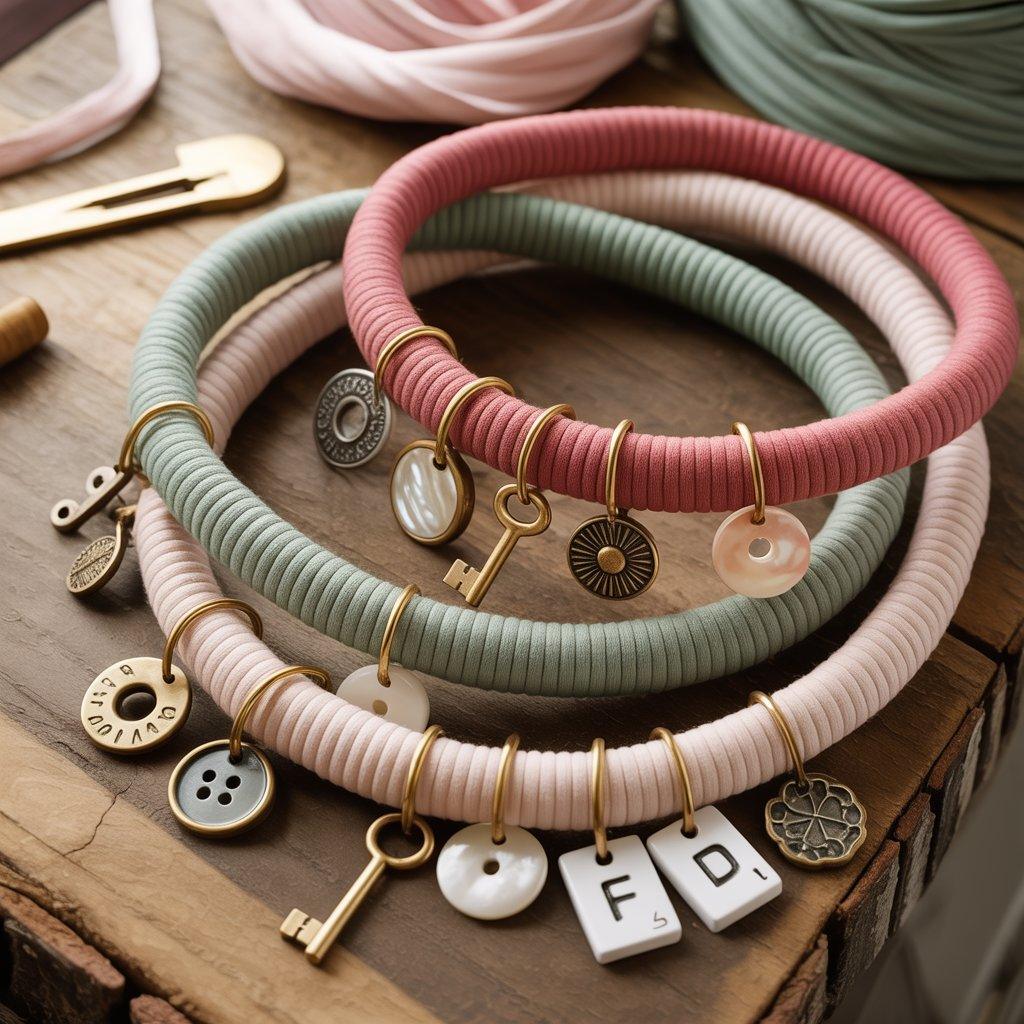
4. T-Shirt Yarn Charm Necklaces
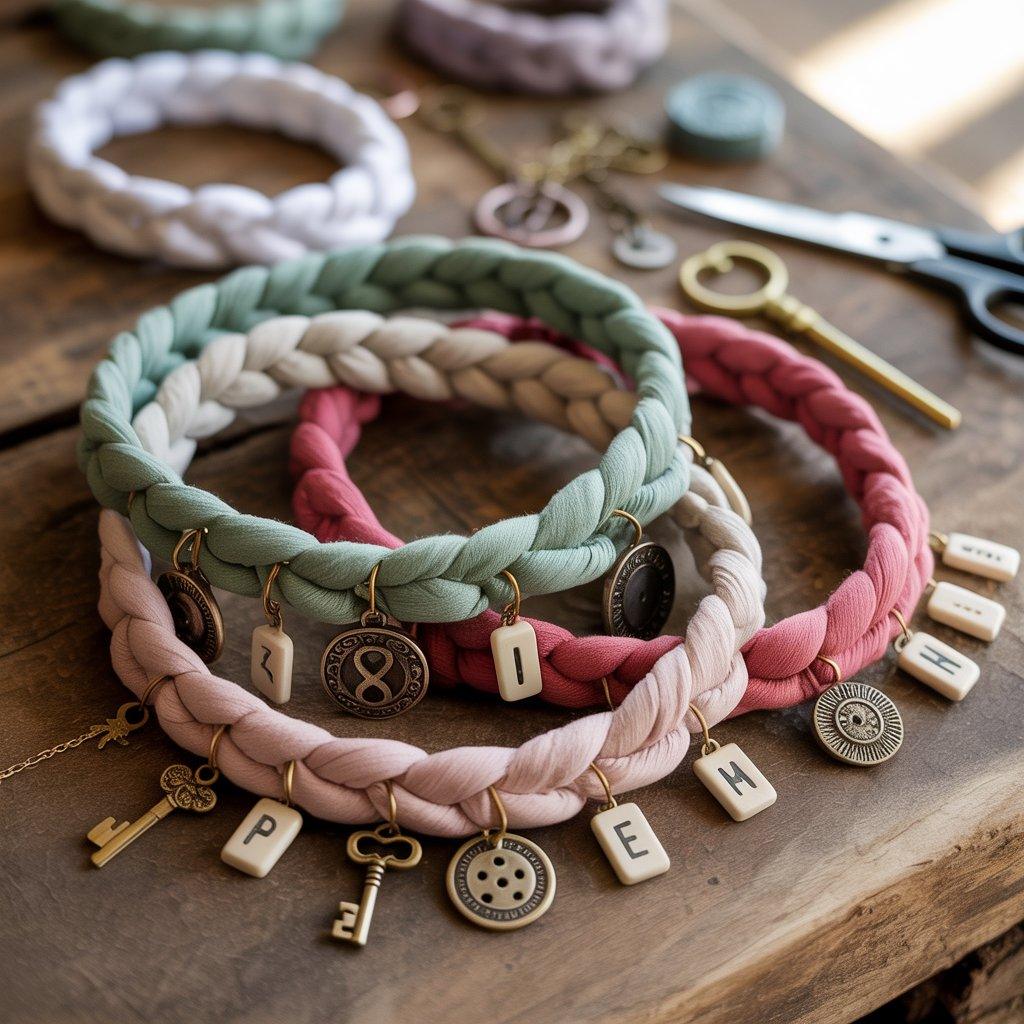
Cut an old t-shirt into a continuous strip to make “t-shirt yarn.” Then use it to crochet or braid simple charm bases. Attach vintage buttons, small keys, or even Scrabble tiles to create statement necklaces. The t-shirt yarn is soft, stretchy, and comes in whatever colors you have on hand.
You don’t need to know complex crochet. Even a basic chain stitch works beautifully. Make a chunky necklace in twenty minutes. Sell them for $10 to $18 depending on the charms you add. This product can help you learn fiber techniques without buying expensive yarn.
T-shirt yarn is essentially free if you use old shirts. The result looks boho and modern at the same time. These necklaces are lightweight and comfortable to wear all day, which customers really appreciate. Make a matching set of two or three in coordinating colors for a higher price point.
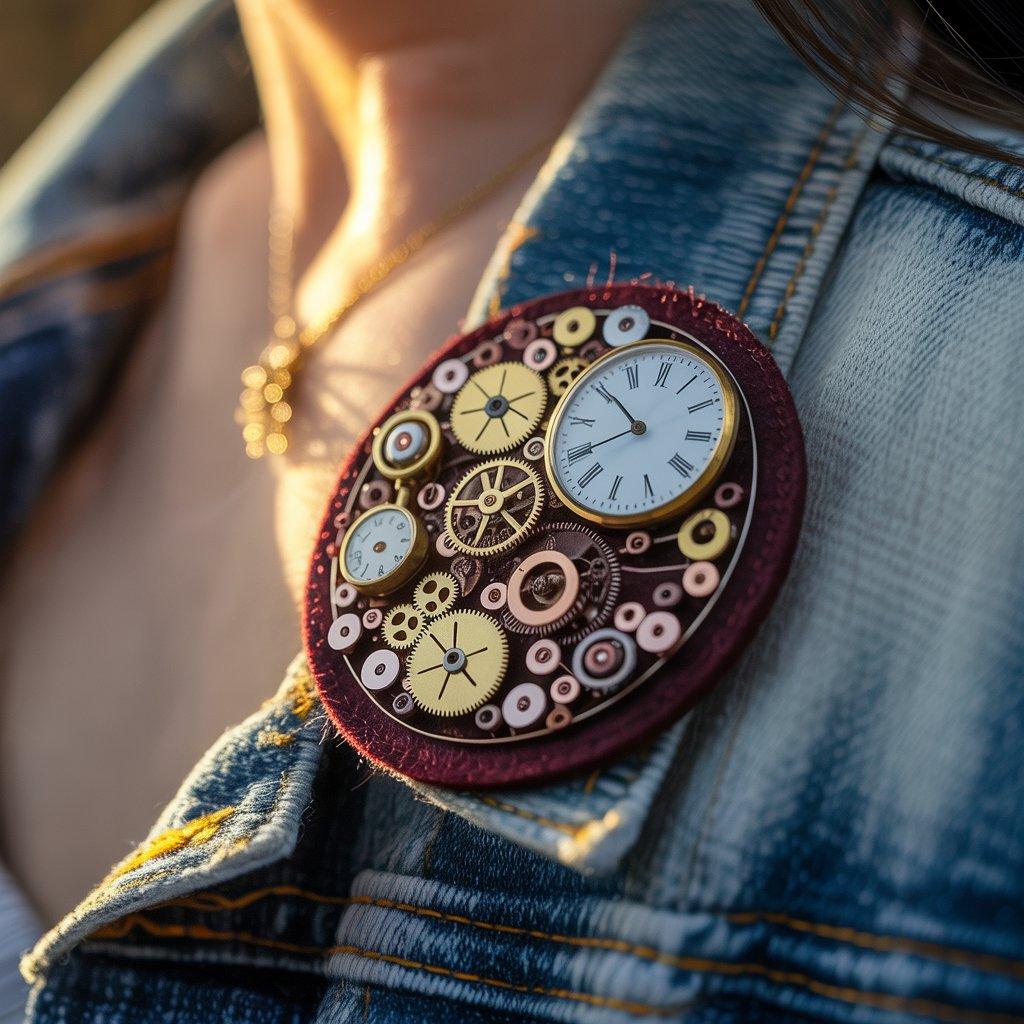
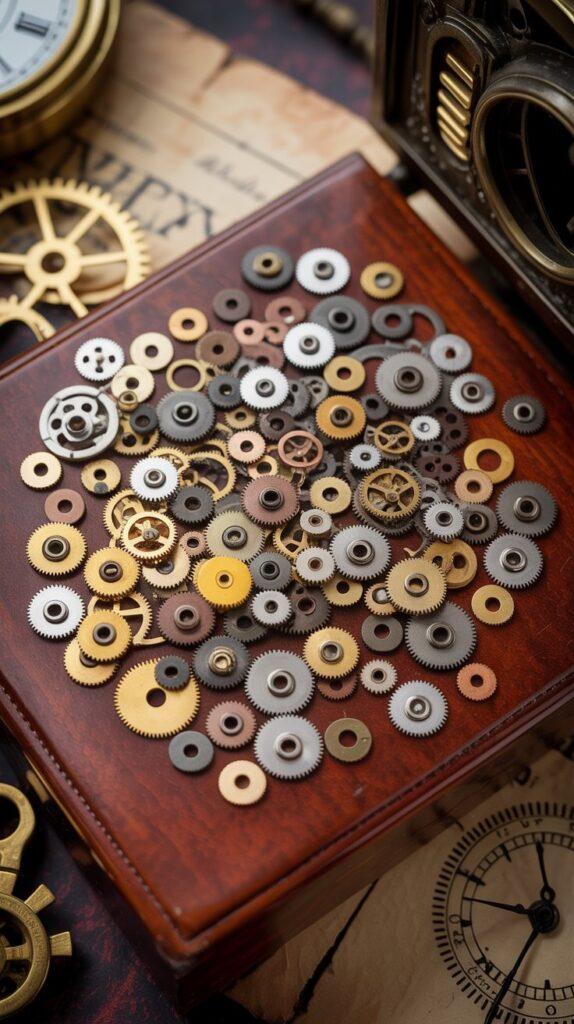
5. Watch Gear Brooches
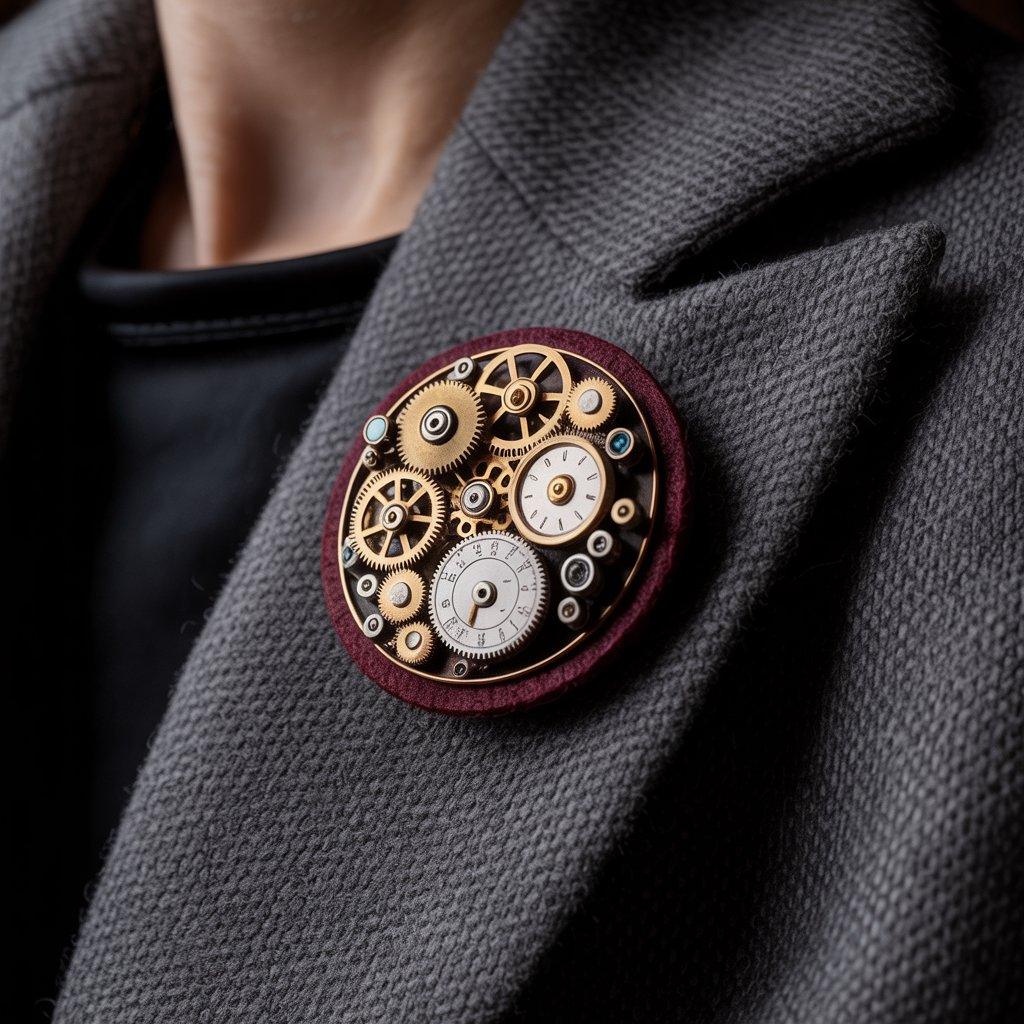
Have an old watch that stopped working? Don’t toss it. Open up the back and carefully remove the tiny gears, springs, and dials. Arrange these mechanical pieces on a small felt or leather circle. Glue them in place with strong adhesive.
Attach a pin back to create a steampunk-style brooch. Each watch gives you enough parts to make three or four brooches. You can find broken watches at thrift stores for a dollar or two. Sell each brooch for $8 to $15. This product can help you practice precise gluing and small-scale design.
The mechanical look appeals to men and women alike, which is rare for handmade accessories. These brooches look fantastic on denim jackets, blazers, or plain canvas bags. They have an antique, mysterious vibe that stands out at any craft fair. Plus, you’re keeping tiny metal parts out of landfills.
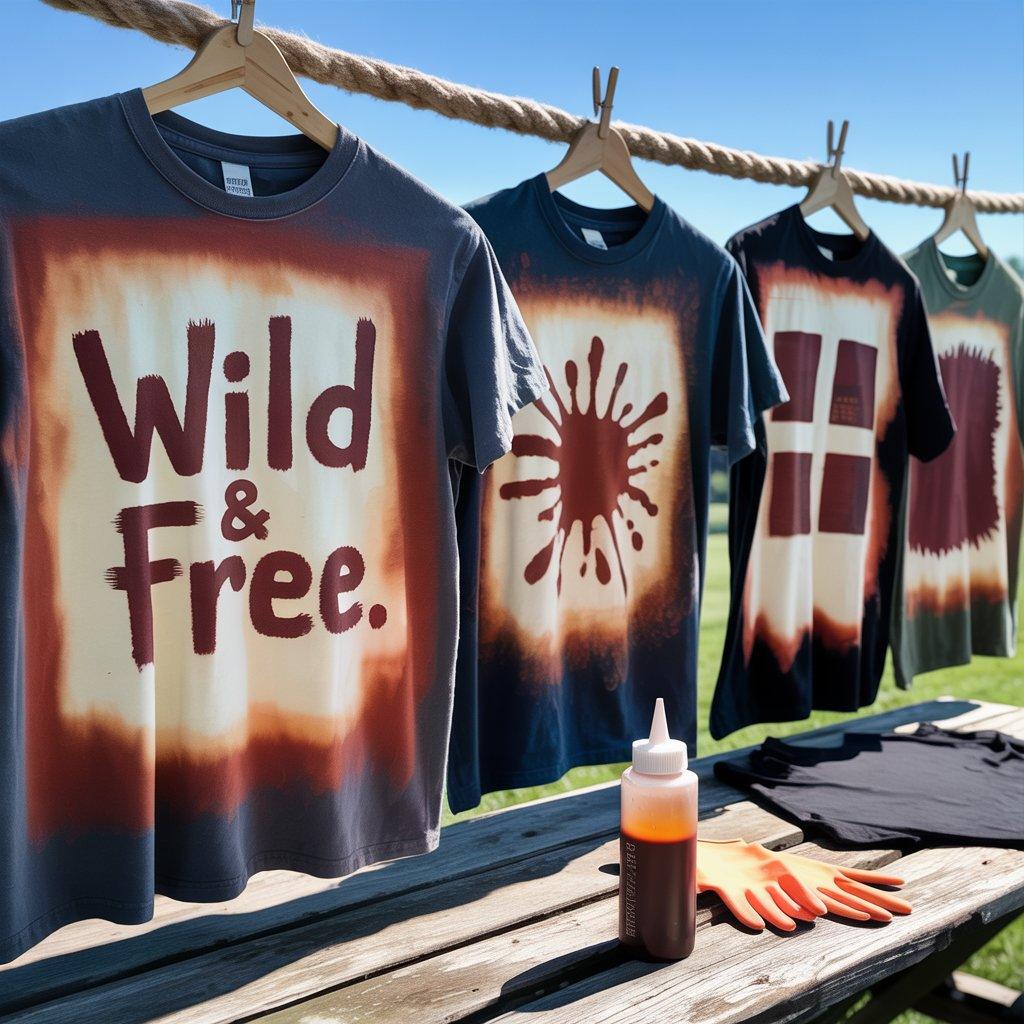
6. Bleed-Your-Own T-Shirt Designs
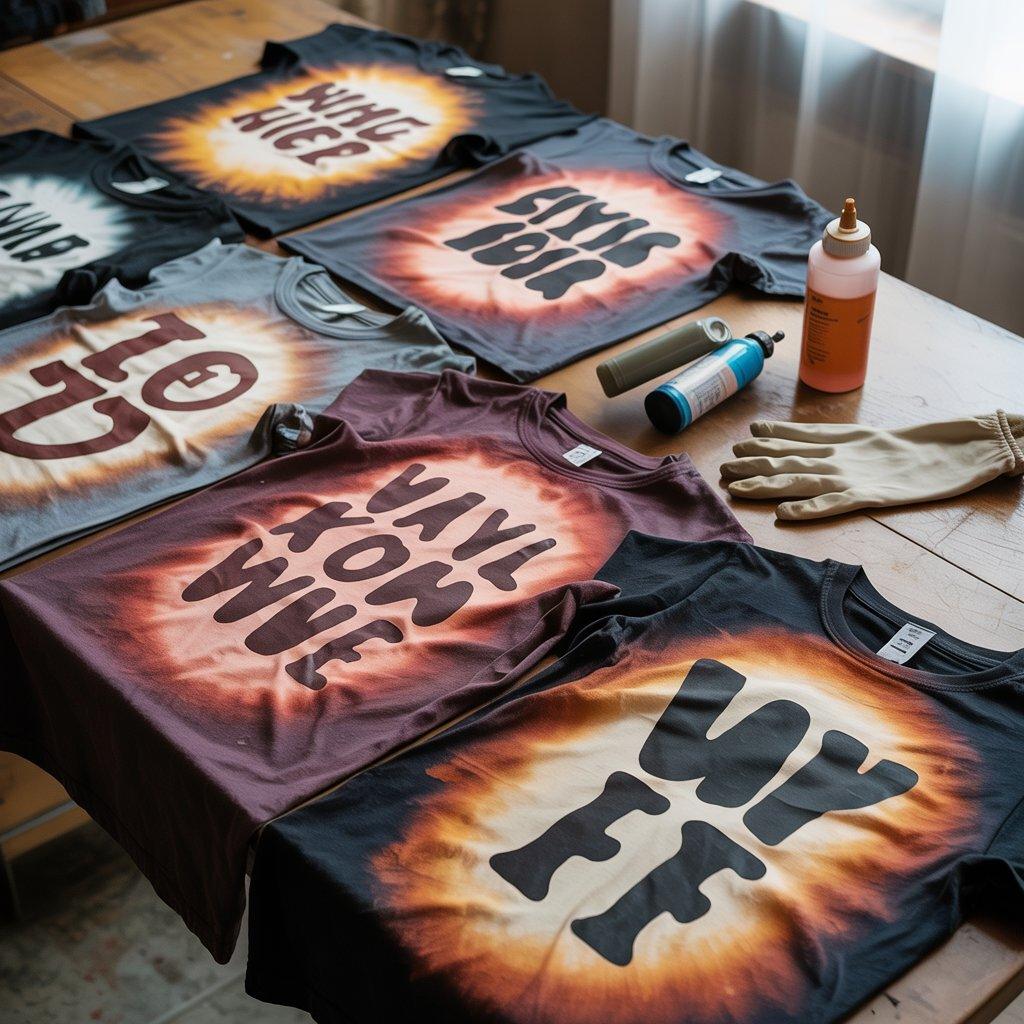
Forget fabric paint and vinyl. Bleach is a surprisingly effective tool for customizing t-shirts. Use a small squeeze bottle to draw designs directly onto dark cotton shirts. The bleach eats away the color, leaving behind a soft, rust-colored pattern that looks naturally distressed.
You can write words, draw simple shapes, or make abstract splatters. The key is working outside and moving fast. Watch the bleach for five to ten minutes, then rinse the shirt thoroughly to stop the reaction. Each shirt costs you maybe $3 to $5 for a thrifted blank. Sell them for $15 to $25.
This product can help you learn about fabric chemistry without any sewing. Every design turns out slightly different, which buyers love. Experiment with stencils or folded techniques for more controlled patterns. Just wear gloves and old clothes because bleach is messy. The slightly unpredictable results are part of the charm.
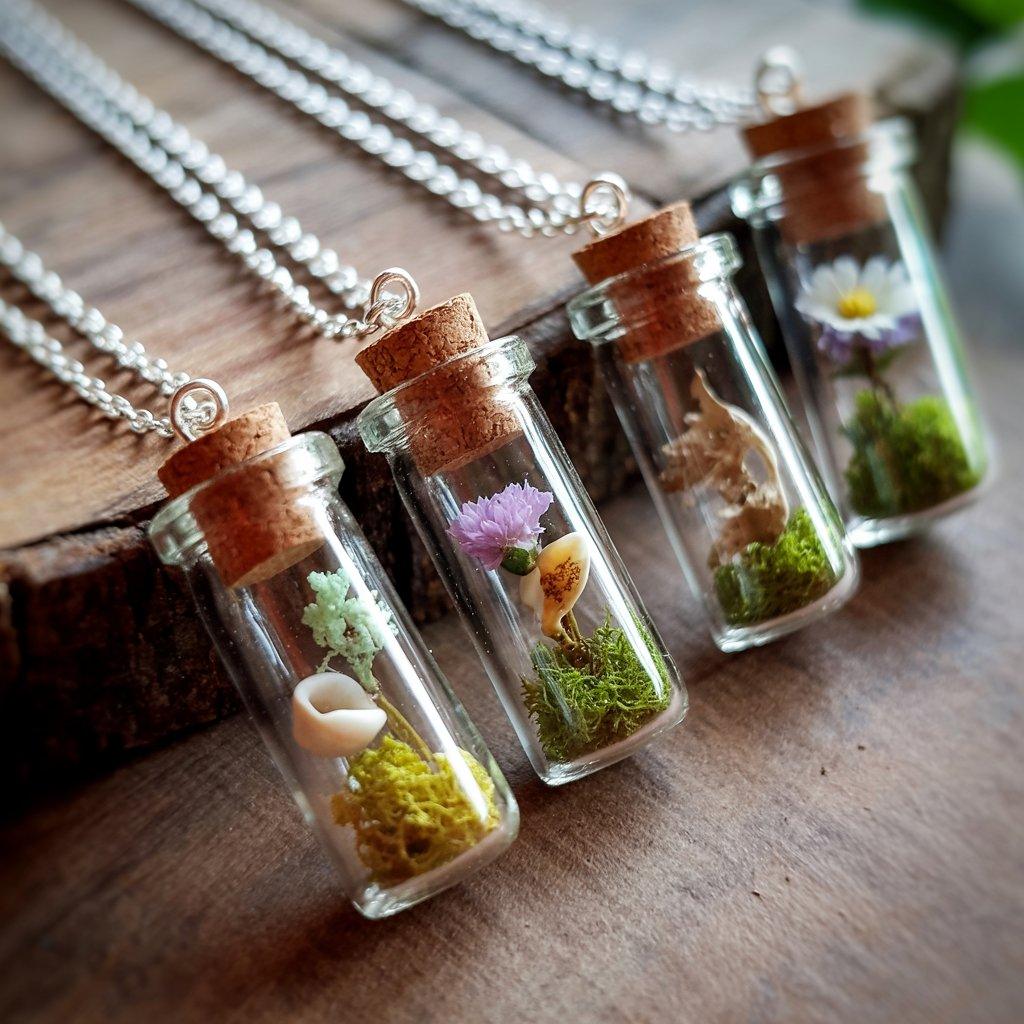
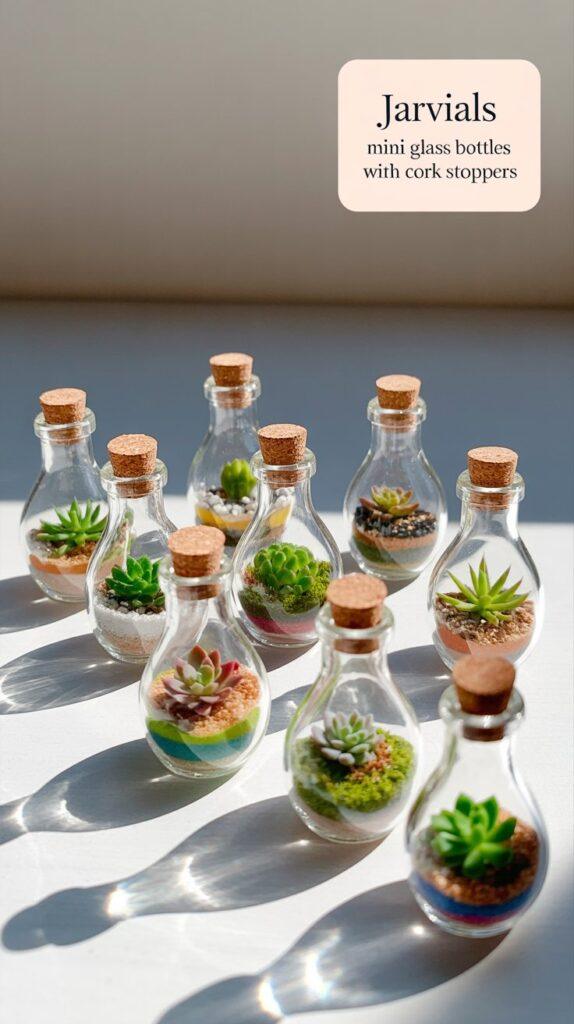
7. Mini Terrarium Pendant Necklaces
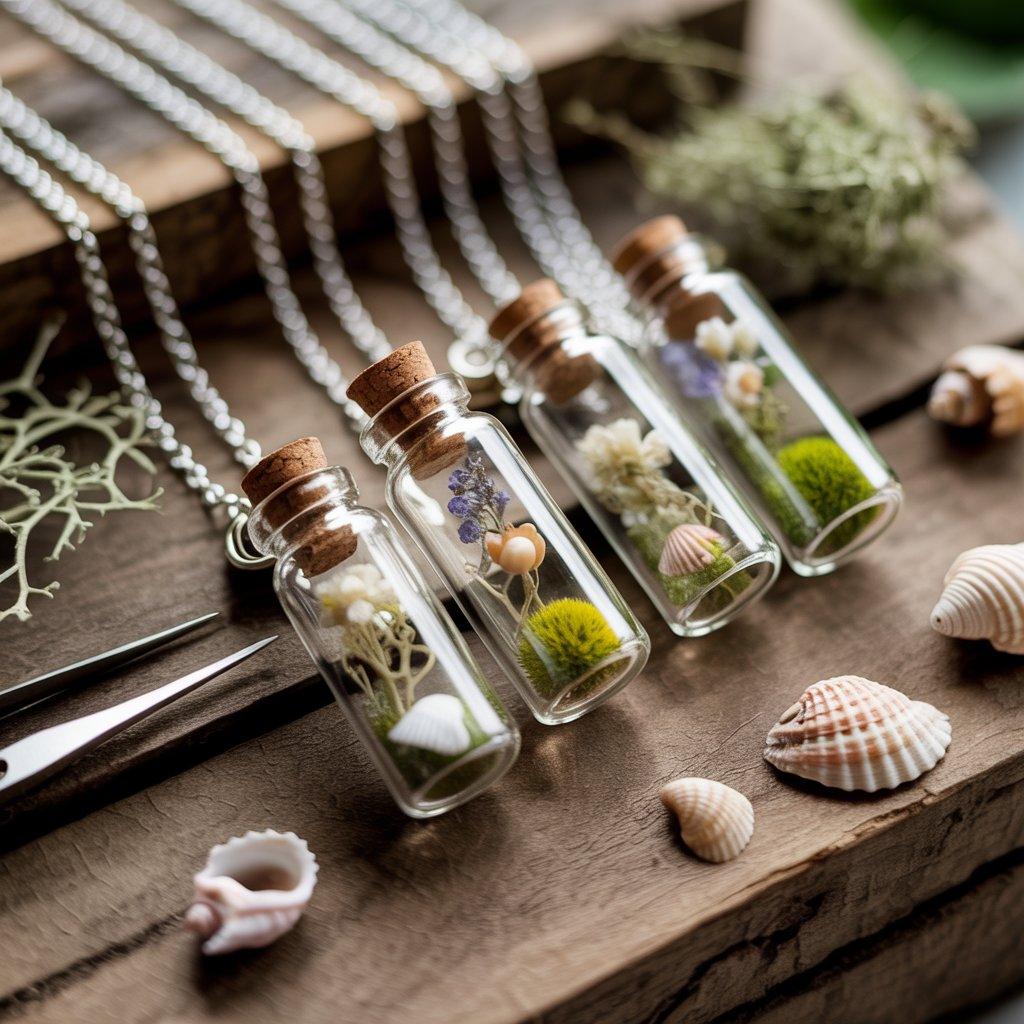
Take a tiny glass vial with a cork stopper and turn it into a wearable world. Use tweezers to place small dried moss, tiny shells, or miniature fake flowers inside. Add a drop of clear glue to hold everything in place. Seal the cork with more glue so nothing falls out.
Attach a small jump ring to the top of the cork and string it onto a chain. These miniature terrariums look magical and mysterious. Each one takes about fifteen minutes to assemble. Sell them for $12 to $20 depending on the size of the vial and the complexity of the scene. This product can help you learn delicate assembly techniques. You can buy glass vials in bulk online for very little money.
The supplies are tiny, so storage is easy. These necklaces appeal to nature lovers, teachers, and anyone who appreciates tiny things. Make a few with beach themes and a few with forest themes to cover different tastes.
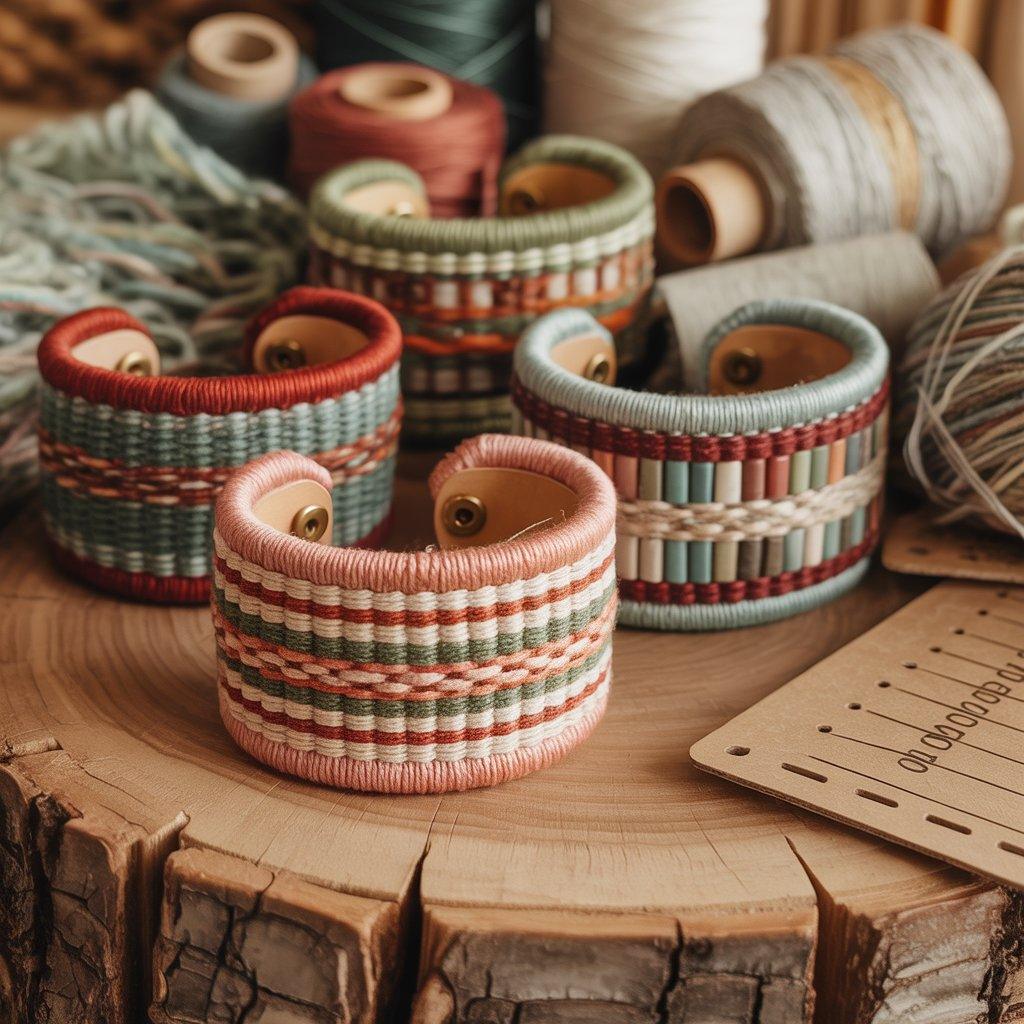
8. Cardboard Loom Woven Cuffs

You don’t need a real loom to make woven fabric. Cut a small rectangle from sturdy cardboard. Wrap thread or yarn around it to create a simple warp. Then weave colorful scraps of fabric, ribbon, or more yarn through the warp using a large plastic needle.
When you’re done, carefully slide the woven piece off the cardboard. Attach a button and a small loop of thread to make a cuff bracelet. The whole thing takes about an hour and costs almost nothing. Sell each cuff for $8 to $12. This product can help you learn basic weaving without buying expensive equipment. You can mix all kinds of materials.
Try thin leather strips, metallic thread, or even unraveled denim fibers. The result looks bohemian and artisanal. People who love natural fibers and handmade textures will gravitate toward these cuffs. Make several in matching color families and display them together.
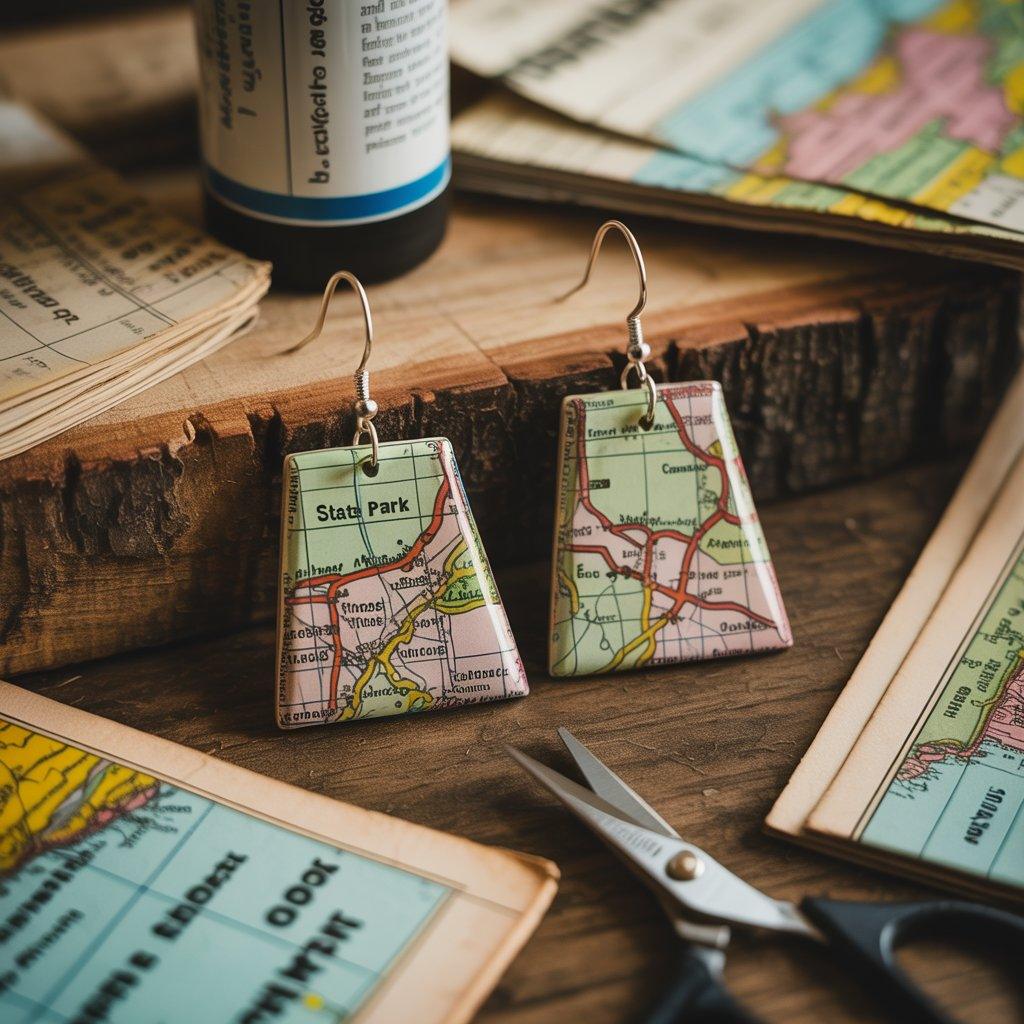
9. Map Section Earrings
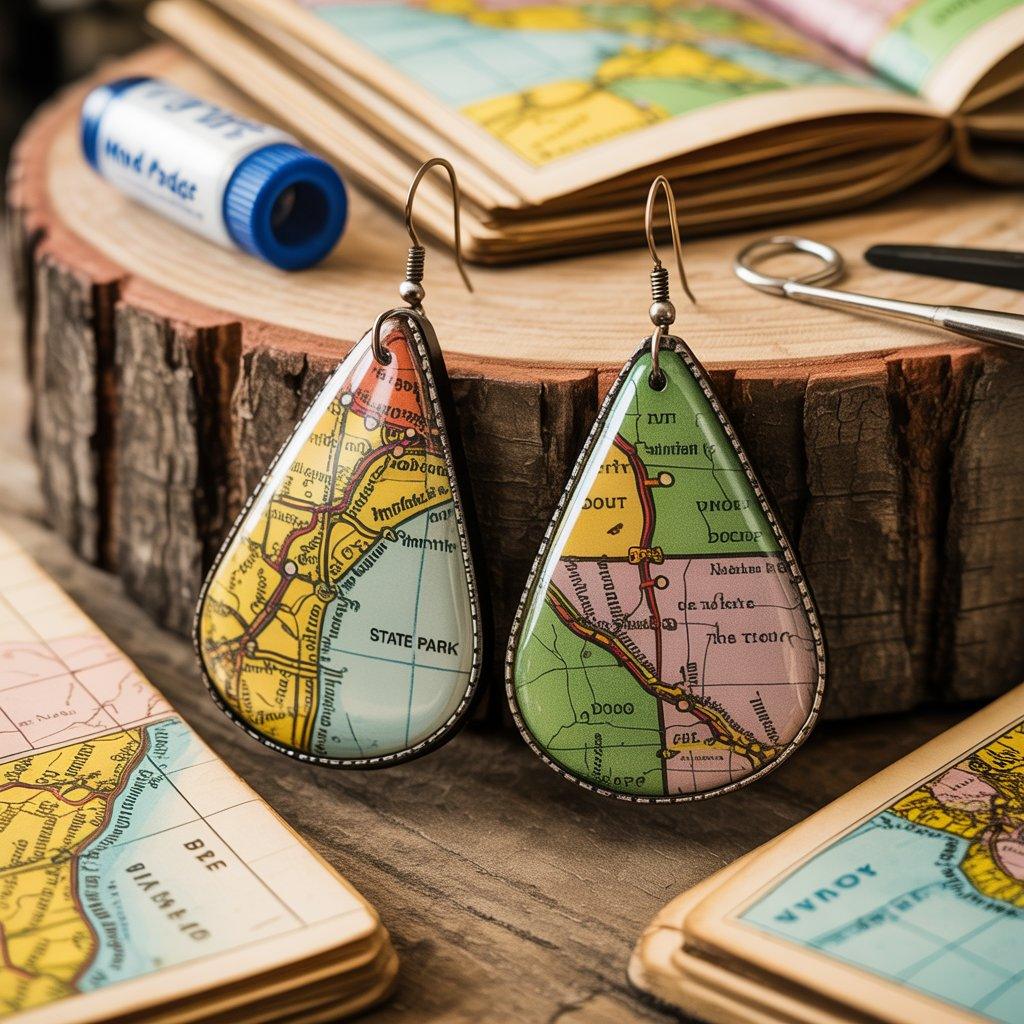
Old road maps, atlases, and even sheet music make surprisingly beautiful jewelry. Cut small triangles or circles from a paper map. Apply a thin layer of clear glue or Mod Podge to both sides to seal and strengthen the paper. Once dry, punch a small hole and attach an earring hook. That’s it.
You can layer two different map sections for a more complex look. Each pair costs pennies to make. Sell them for $6 to $10. This product can help you practice working with paper and glue. The key is choosing map sections with interesting details. A cluster of tiny roads, a river bend, or a state park boundary all look great.
These earrings are incredibly lightweight, so they’re comfortable to wear all day. They appeal to travelers, geography nerds, and anyone who appreciates vintage aesthetics. Make a batch from maps of different cities and watch tourists snap them up as souvenirs.
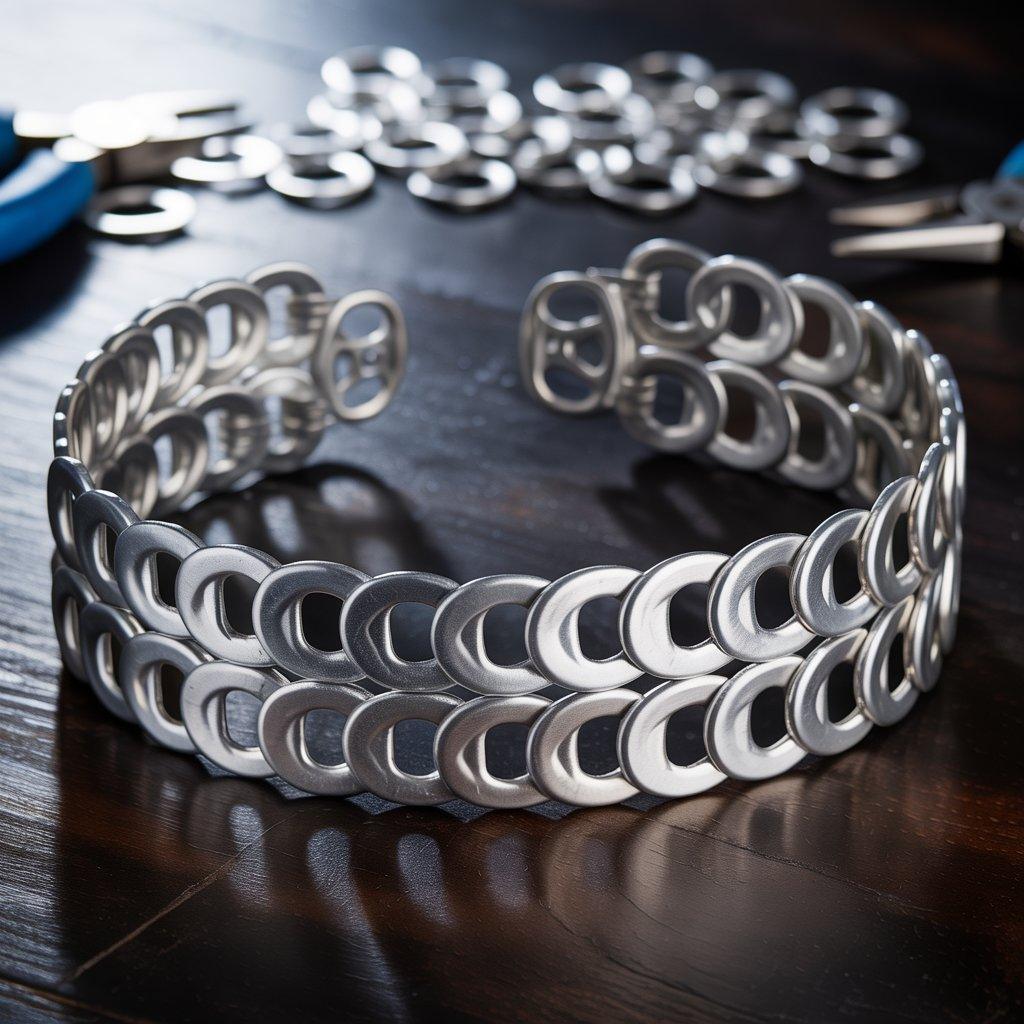
10. Soda Tab Chain Belt
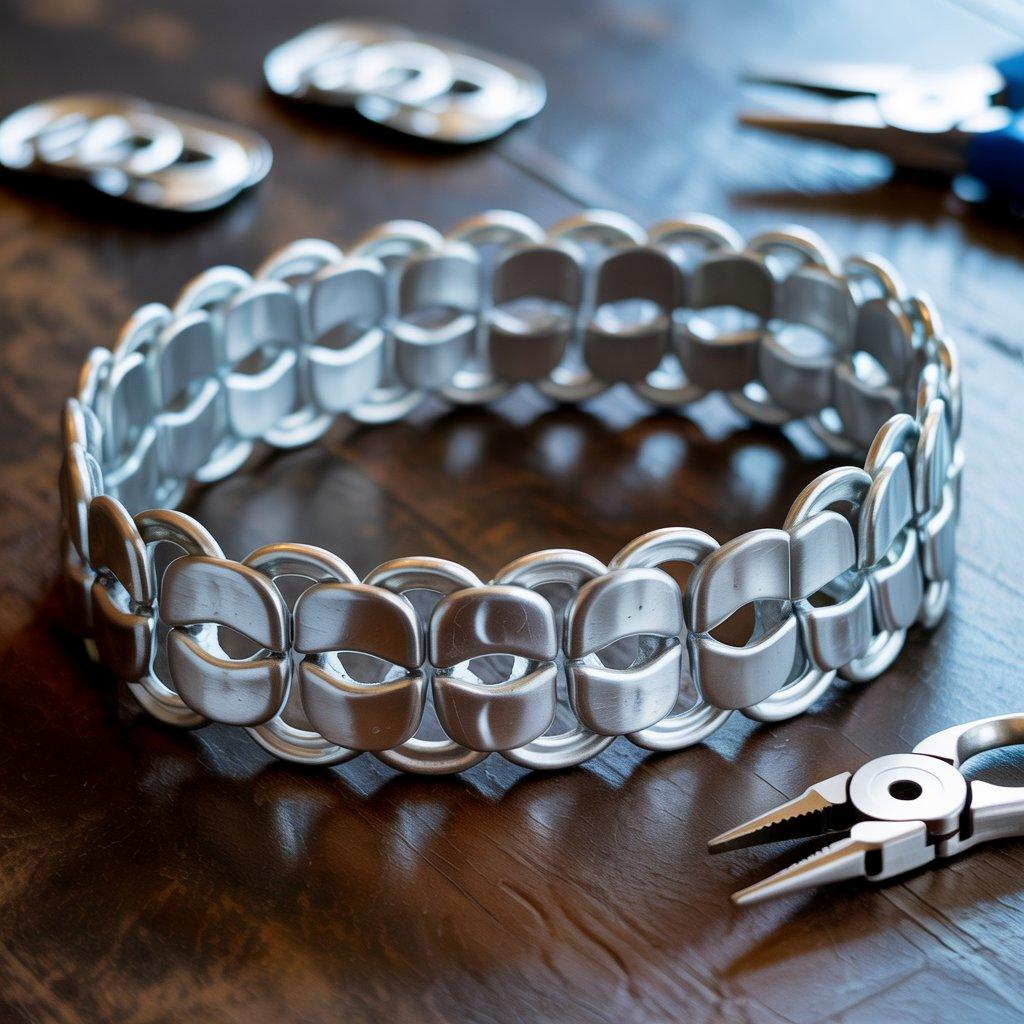
Those aluminum pull tabs from soda cans are surprisingly useful. Save up about fifty of them. Use pliers to bend the tabs so they lay flat. Then link them together by slipping each new tab through the previous one. Close the links by squeezing the tabs with pliers.
Add a small clasp at both ends to create a lightweight, metallic chain belt. You can also turn the same technique into a chunky necklace or bracelet. This project costs absolutely nothing if you save your own tabs. Sell a finished belt for $10 to $15.
This product can help you learn basic metal linking without any soldering. The result looks edgy and industrial. You can spray paint the tabs gold or silver for a more polished look. Or leave them as-is for a raw, recycled aesthetic.
People who love upcycled fashion will appreciate the creativity. These belts are especially popular with teenagers and young adults who want unique accessories.
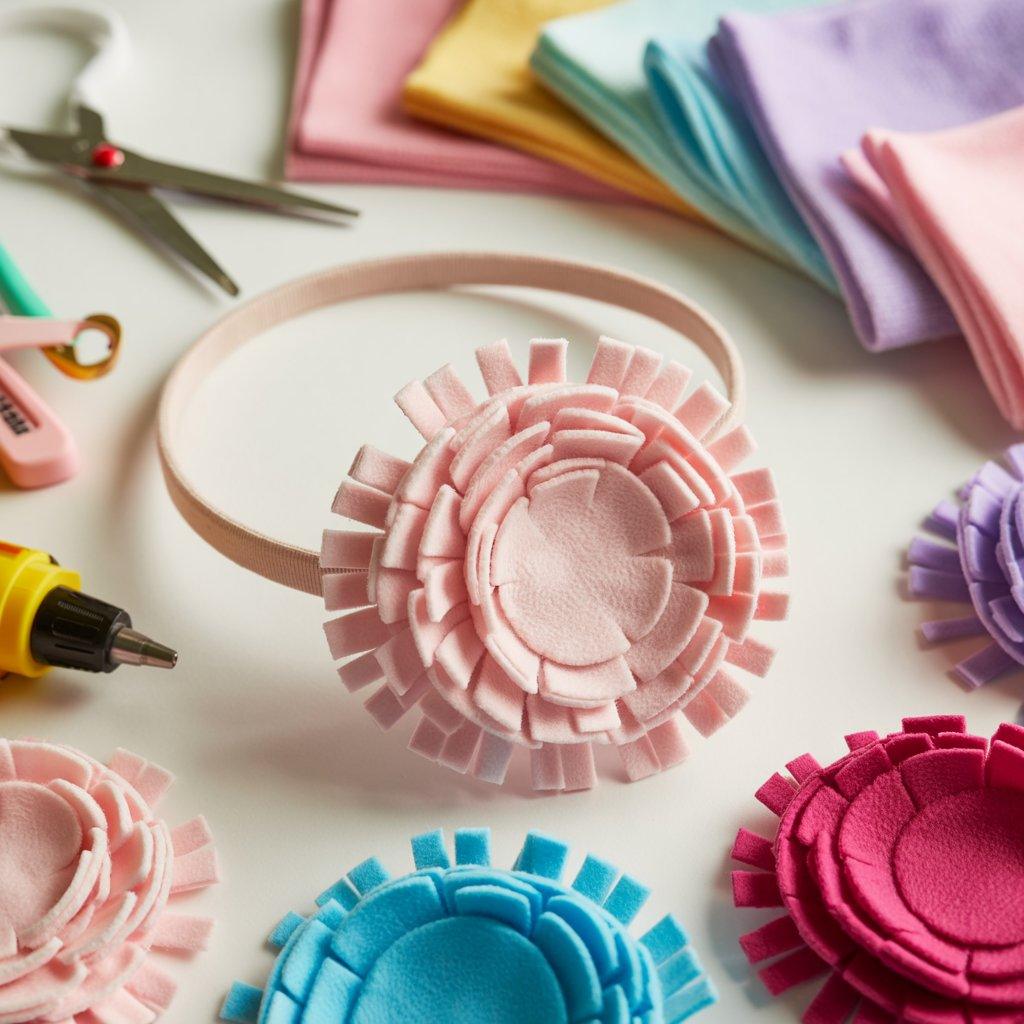
11. No-Sew Fleece Flower Headbands
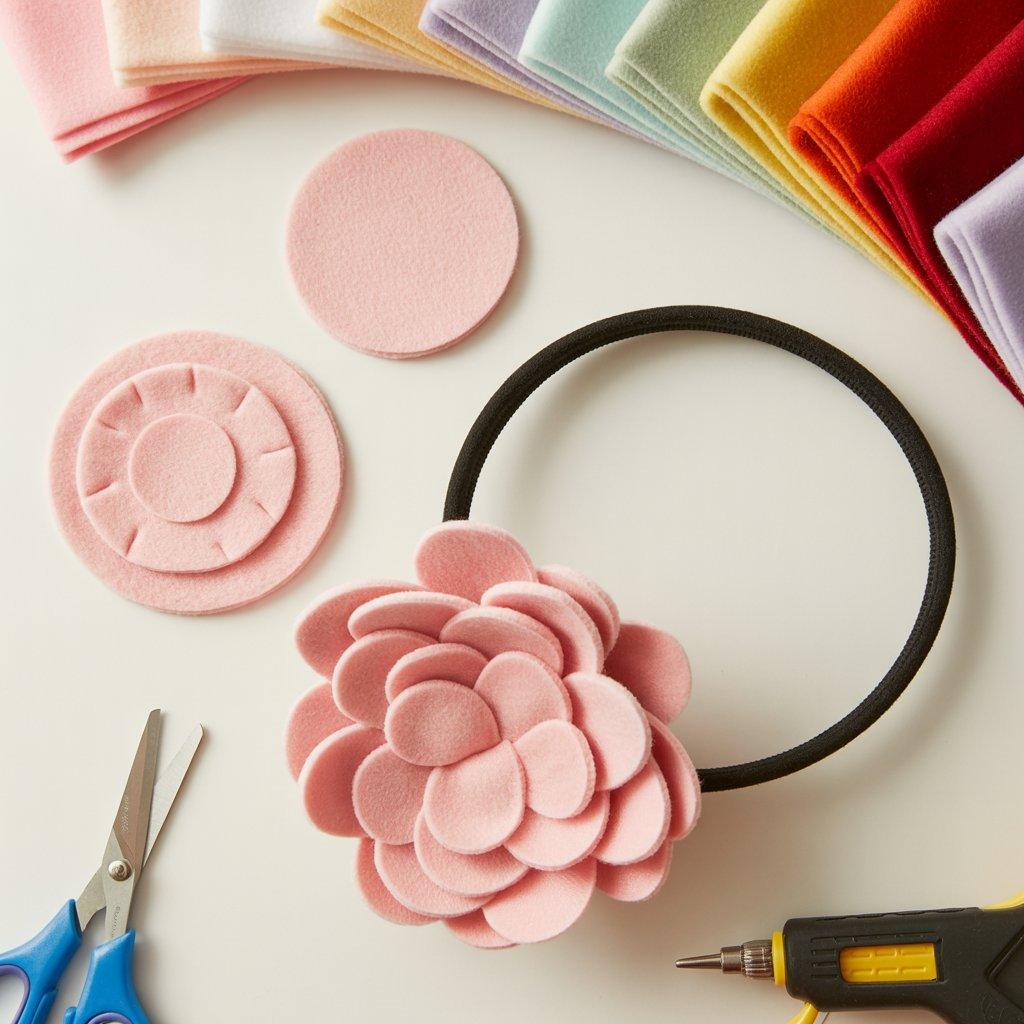
Buy a quarter yard of fleece fabric in any color. Cut circles in three different sizes. Layer the circles with the largest on bottom and smallest on top. Make small cuts around the edges of each circle to create petal shapes.
Stack them, then use a hot glue gun to attach all the layers together in the center. Glue the finished flower onto a plain stretchy headband. The fleece doesn’t fray, so you don’t need to hem anything. You can make a flower in about ten minutes. Sell finished headbands for $8 to $12. This product can help you practice cutting fabric and using a glue gun precisely.
Make flowers in pastels for spring or rich jewel tones for winter. You can also add a felt circle on the back to hide the glue and make it look professional. These headbands are perfect for bad hair days, workout gear, or just adding a pop of color to a simple outfit. They make great gifts for teenage girls.
12. Patchwork Denim Collar
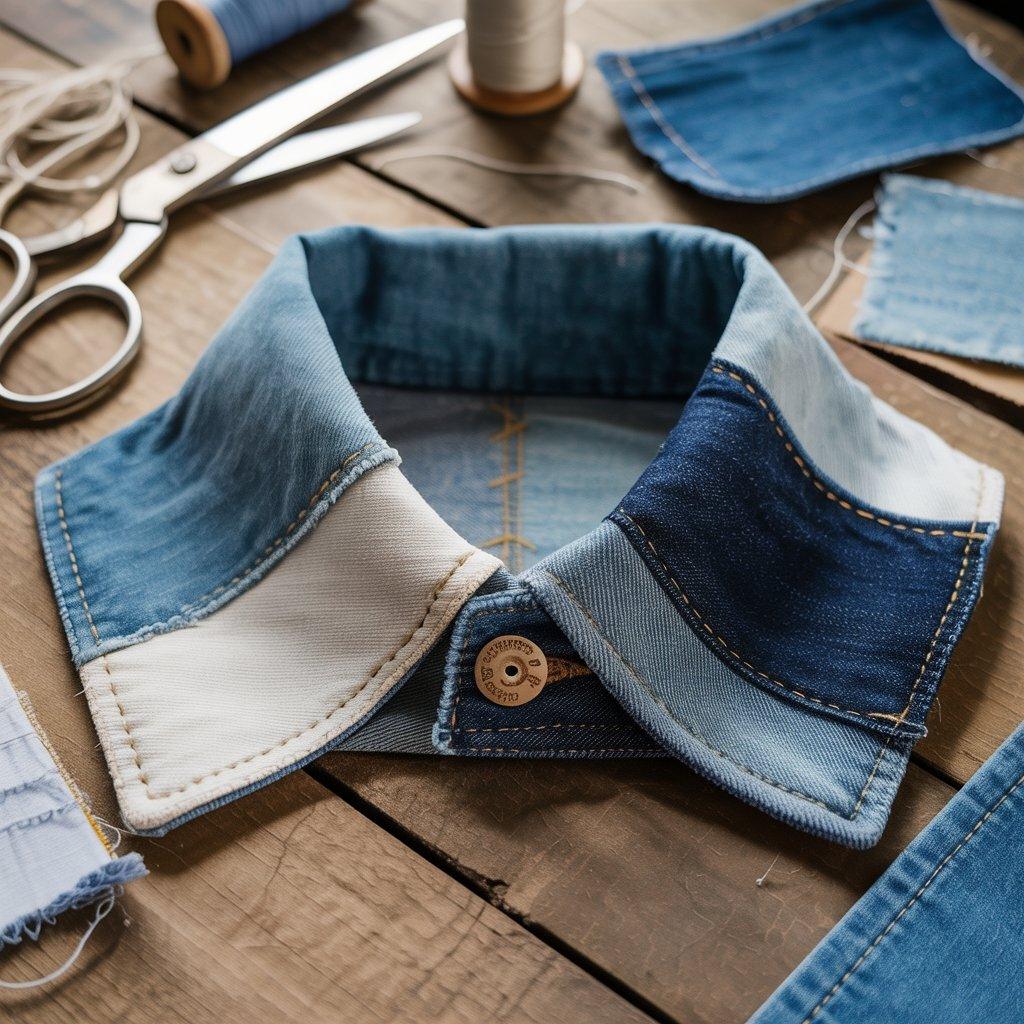
Take an old denim jacket or a pair of jeans that no longer fit. Cut out several different sections to get different washes of denim. Arrange the pieces in a patchwork pattern, then sew them together to form a wide strip.
Fold the strip in half and stitch it into a collar shape that fits around your neck. Add a button or a ribbon tie at the front. You now have a detachable denim collar that you can wear over plain t-shirts or sweaters. This project takes a few hours but only uses materials you probably already have. Sell finished collars for $15 to $25.
This product can help you practice piecing fabric and basic garment construction. The collar instantly elevates a basic outfit. People who love western or vintage styles will adore this accessory. Make a few with lace trim or embroidered details for a more feminine look.

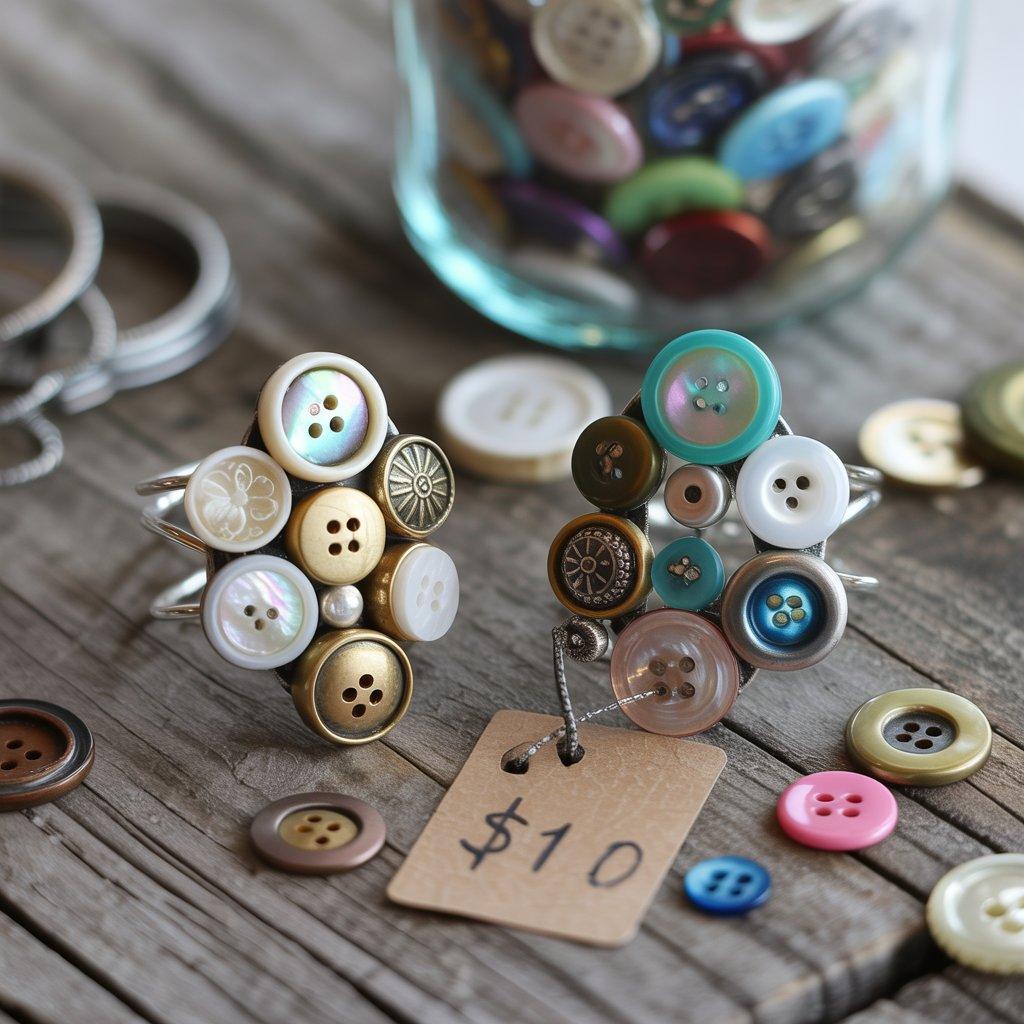
13. Button Cluster Rings
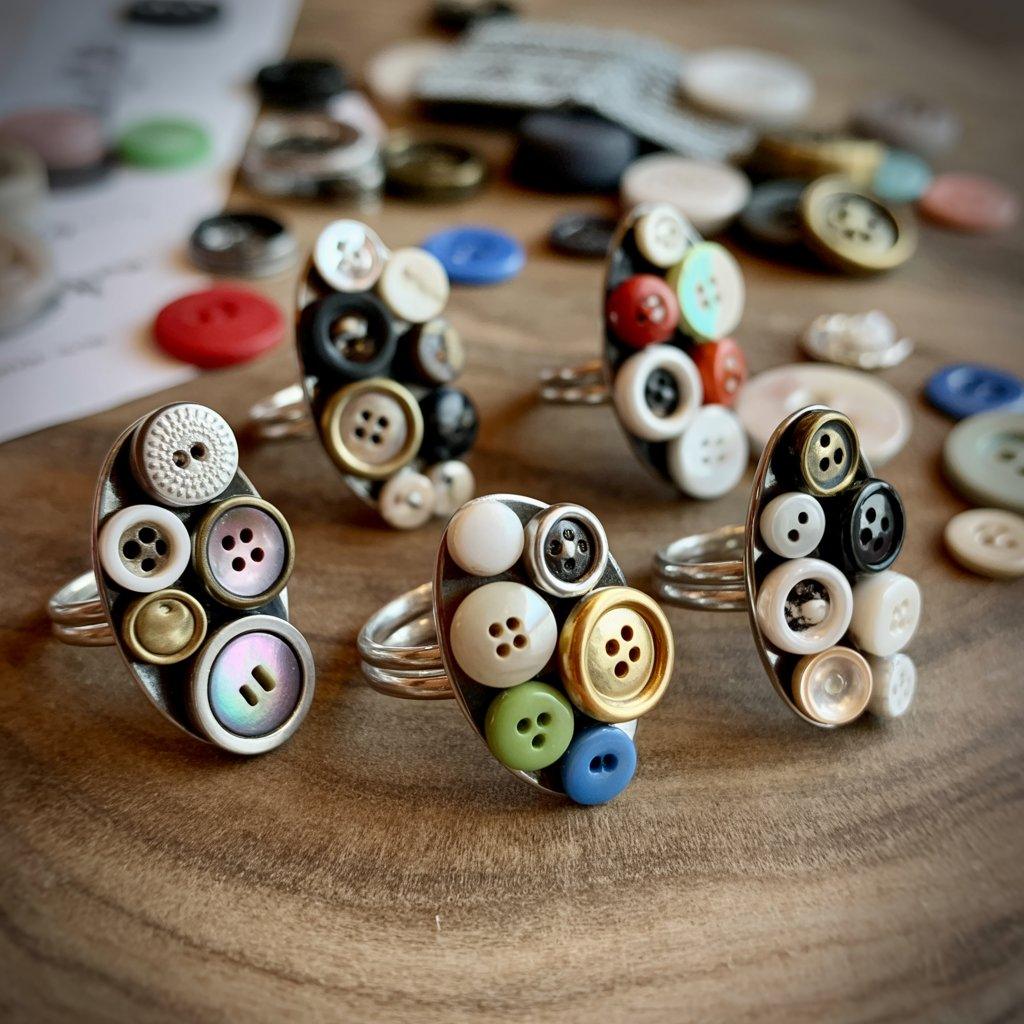
Dig through your button jar and find five or six buttons that look good together. They don’t have to match. Mixing different sizes, colors, and materials creates the most interesting results. Use strong glue to attach the buttons to a flat metal ring base or an adjustable ring blank.
Arrange them like a little cluster or stack them in a tower. Let the glue dry completely for 24 hours before wearing. Each ring costs under $3 in supplies. Sell them for $8 to $12. This product can help you practice composition and color theory in a small, forgiving format. The results are whimsical and unique.
Vintage buttons work especially well because they often have interesting patterns and textures. These rings appeal to quirky fashion lovers and make great gifts. You can make a batch of ten in an afternoon because the assembly is so fast.
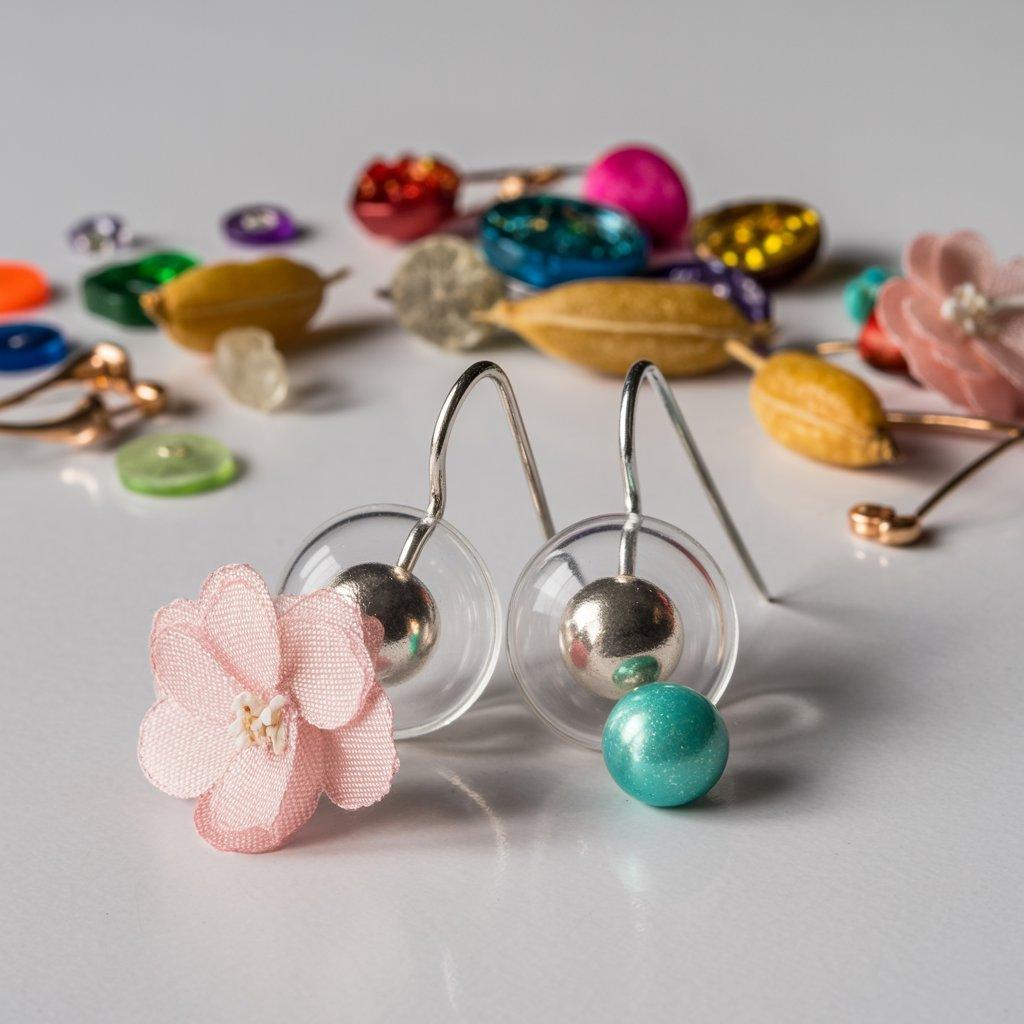
14. Suction Cup Earrings
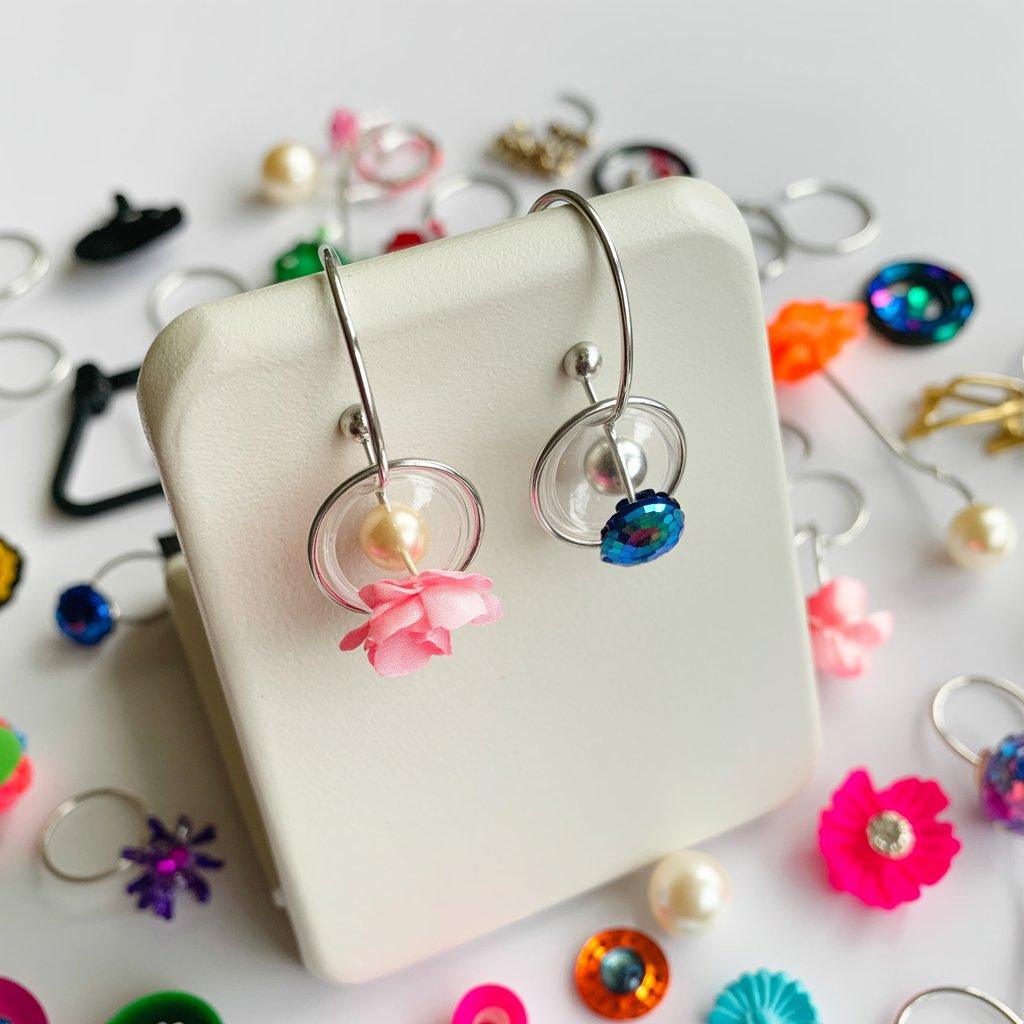
Buy a pack of tiny suction cups from a hardware store or online. Attach a small jump ring and an earring hook to the back of each suction cup using strong glue. That’s the basic earring. But here’s the fun part. You can stick small objects onto the suction cup part.
A tiny fake flower, a small bead, a sequin, or even a dried pea. The object stays attached by suction, so the wearer can swap out the decorations depending on their mood. You could sell a starter set of plain suction cup earrings plus a little bag of interchangeable decorations. Sell the set for $12 to $18. This product can help you learn about interchangeable design, which is a hot trend in accessories.
The novelty factor is huge. People love the idea of earrings that change. Kids and young adults will find these irresistible. Make sure the suction cups are small enough to look like earrings rather than shower accessories.
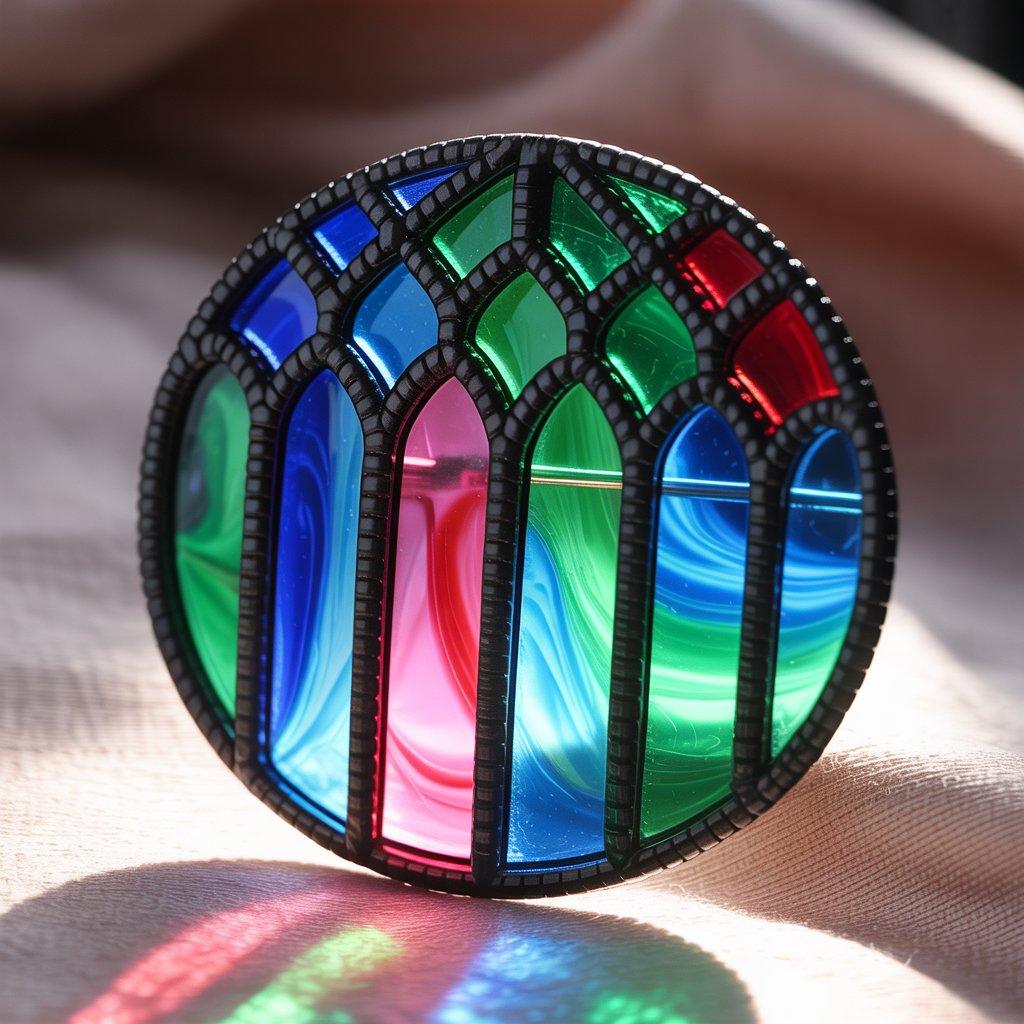
15. Faux Stained Glass Brooch
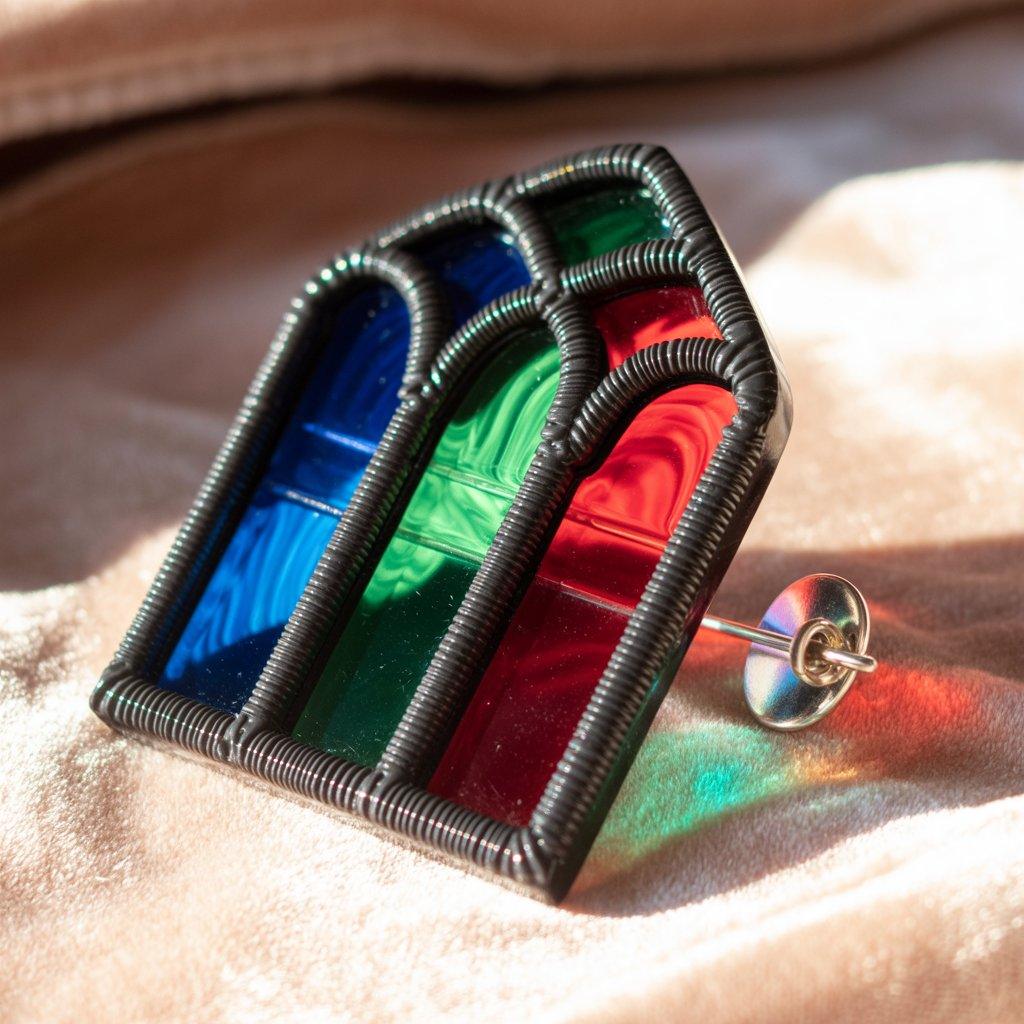
Take a small picture frame or a jewelry tray bezel. Paint the inside edges with black puffy paint to look like the lead lines in stained glass. Let the paint dry completely. Then fill the open spaces with different colors of clear resin or UV resin.
Add a drop of color here and a drop there. Swirl them slightly with a toothpick but don’t mix them completely. Cure the resin. The result looks exactly like a tiny stained glass window. Attach a pin back. Each brooch takes about thirty minutes of active work plus drying time. Sell them for $12 to $18. This product can help you practice resin work in a small, manageable format.
The colorful results appeal to everyone who loves church windows, art deco, or simply bright colors. Make a batch in rainbow colors or stick to a specific palette like blues and greens. These brooches look fantastic on denim jackets, winter coats, or plain canvas bags.
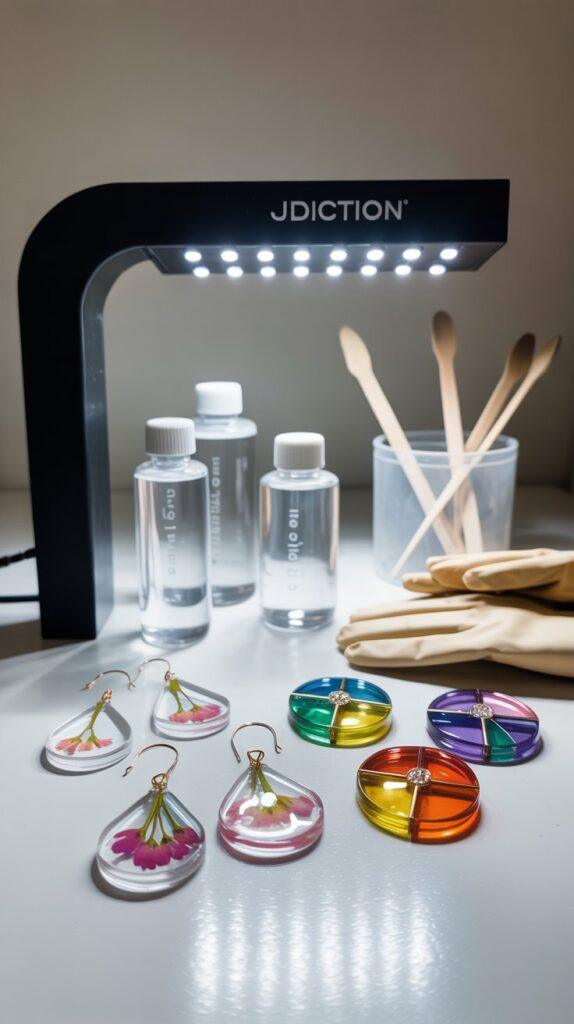
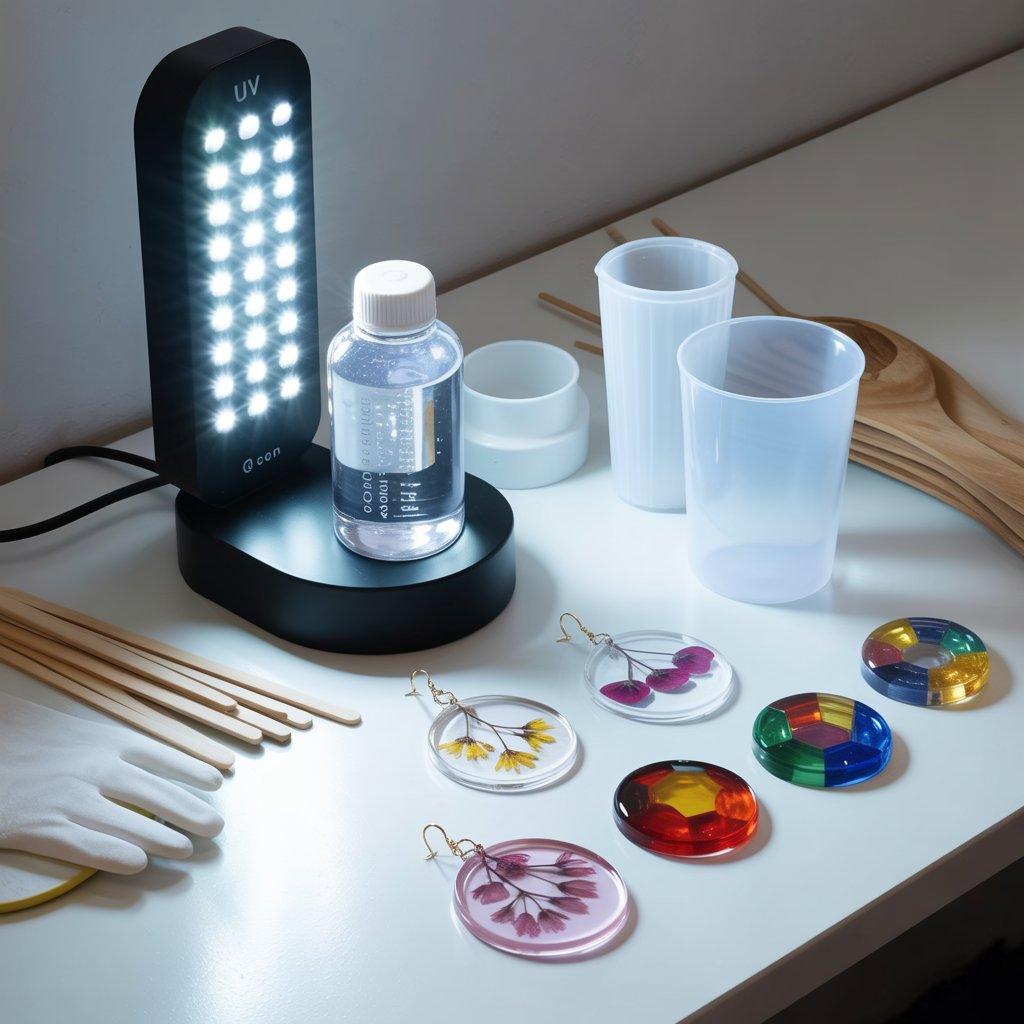
1. JDiction UV Resin Kit with Light

Best for: Pressed flower resin earrings and faux stained glass brooches (Projects #1 & #15)
This complete starter kit comes with crystal clear resin and a powerful 8-bead UV lamp. The resin has a low odor, is bubble-free, and resists yellowing over time. It cures hard (75D hardness) with a glossy, glass-like finish that looks professional. The kit includes silicone cups, pads, mixing sticks, and gloves.
Why this product can help you:
You can create waterproof, tarnish-free jewelry in minutes without mixing messy two-part resins. The lamp cures each layer in 1–5 minutes, so you can work quickly.
Check price on Amazon.com: JDiction UV Resin Kit with Light (Amazon’s Choice)
2. FOCCTS Steampunk Watch Gears
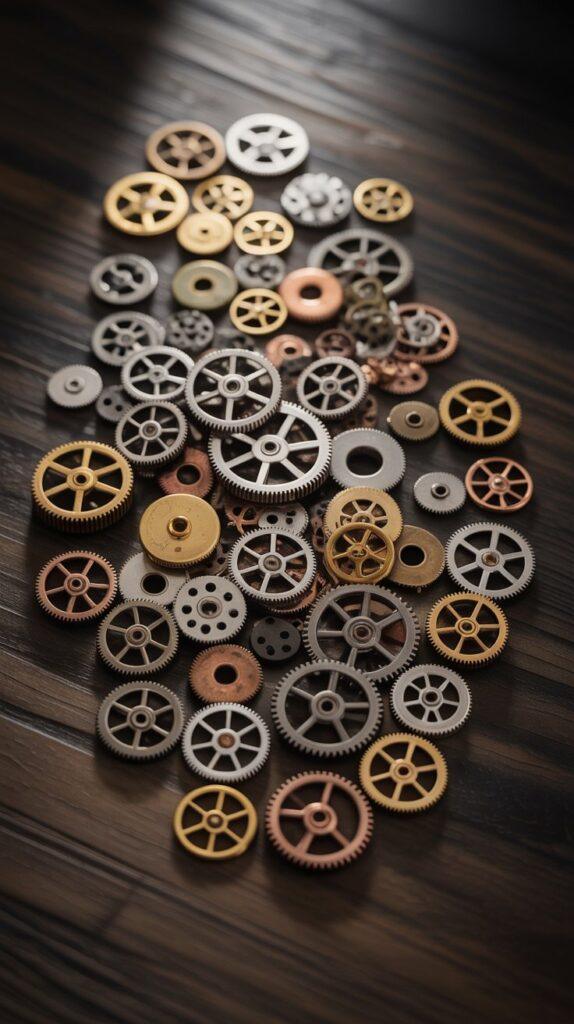
Best for: Watch gear brooches (Project #5)
This set includes 100 grams of mixed metal gears in various sizes (7mm to 30mm) and finishes like bronze, copper, gold, and silver. The gears are antique-style alloy charms, perfect for creating brooches, pendants, or earrings.
Why this product can help you:
You don’t need to take apart old watches or hunt for broken timepieces. These ready-to-use gears come in a convenient mix, saving you time and ensuring consistent quality for each piece you make.
Check price on Amazon.com: FOCCTS 100g Steampunk Watch Gears
3. Jarvials Mini Glass Bottles with Cork Stoppers
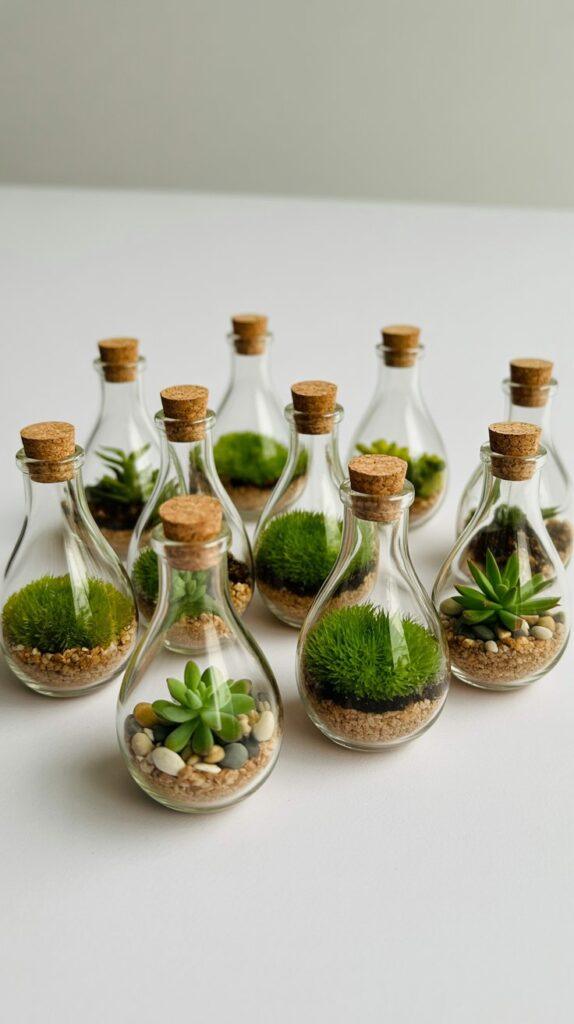
Best for: Mini terrarium pendant necklaces (Project #7)
This set includes 10 water-drop-shaped clear glass bottles with cork stoppers. Each bottle is small enough for a pendant but large enough to hold tiny moss, soil, or miniature flowers. The transparent glass makes your mini terrarium visible from all angles.
Why this product can help you:
You can create living jewelry that tells a story. Layer sand, pebbles, moss, and a tiny succulent inside. The cork seals in moisture to keep the plants healthy. Customers love these because each piece is truly alive and unique.
Check price on Amazon.com: Jarvials Mini Glass Bottles
Helpful Tips for Beginners
- Start with just one or two projects from this list. Trying all fifteen at once will overwhelm you.
- Buy supplies in small quantities at first. You don’t need a gallon of resin to make ten pairs of earrings.
- Take photos in natural daylight. Bad photos make even the coolest projects look boring.
- Practice your selling pitch. People will ask “what is that made from?” Have a short answer ready.
- Price your items by doubling the cost of supplies and adding $5 to $10 for your time. Adjust up or down depending on your local market.
Mistakes to Avoid
- Skipping safety steps. Resin requires ventilation and gloves. Bleach requires old clothes and outdoor space. Don’t cut corners.
- Using the wrong glue. Regular school glue won’t hold metal or glass. Buy E6000 or jewelry glue.
- Making pieces too heavy. Nobody wants earrings that pull on their earlobes. Test your pieces before selling them.
- Copying someone else’s exact design. You can be inspired without stealing. Make your own versions.
- Giving up after one messy attempt. The first try is never perfect. Keep going.
Frequently Asked Questions
Are these projects really beginner-friendly?
Yes. I chose projects that don’t require advanced sewing, soldering, or specialized equipment. Most use materials you can find at a hardware store, thrift shop, or craft store.
How much money can I actually make?
Beginner crafters often earn $100 to $400 a month from unique projects like these. The key is finding your niche. Unusual items often sell faster because they face less competition.
Where should I sell unusual fashion crafts?
Etsy works well for unique items because buyers are searching for things they can’t find elsewhere. Local craft fairs are also great because people can see your unusual materials up close. Instagram and TikTok help you show off how you made each piece.
What if my pieces look a little messy?
Embrace it. Handmade items don’t have to look factory-perfect. Some buyers specifically look for the charm of visible craftsmanship. As long as your pieces are sturdy and safe, a little imperfection adds character.
Design & Styling Ideas
- Group your items by color story on your display table. A rainbow of resin earrings catches the eye.
- Show photos of your pieces being worn. People need to imagine how they’ll look on a real person.
- Create small themed collections. Beach terrarium necklaces. Steampunk watch gear brooches. Botanical resin earrings.
- Offer custom options. Let people choose their own map section or flower color. Custom work sells for higher prices.
- Package your items nicely. A simple kraft paper card with a handwritten price tag looks professional without costing much.
Conclusion
You don’t need to make the same things as everyone else. The most profitable craft projects are often the ones nobody else is doing. Pick one unusual idea from this list that excites you. Gather the supplies. Make five pieces. Put them out there and see what happens.
The people who succeed in handmade fashion aren’t necessarily the most skilled sewers or painters. They’re the ones who try something different. So grab some broken plates, save your soda tabs, and make something genuinely weird. Your first sale might come faster than you think.
Related Post: